|
PLEASE NOTE: this is intended to be a general guide to introduce you to the ftwilliam.com 5500 software features and structure. More detail is often provided at ftwilliam.com. At the top of every page after entering the 5500 software you should find a link to "Help" (where you will find this guide) and a link to contact "Support" (via email). You may also call us during regular business hours (8AM-5PM Central) at (800) 596-0714. This number can also be found at the bottom of every page in your account.
| Contents | |
Introduction to the ftwilliam.com Software; Accessing the 5500 Software TopLogging In. TopYou will need the company code, username and password you received when you signed up for the ftwilliam.com system.
General ftwilliam.com website features available after log-in:
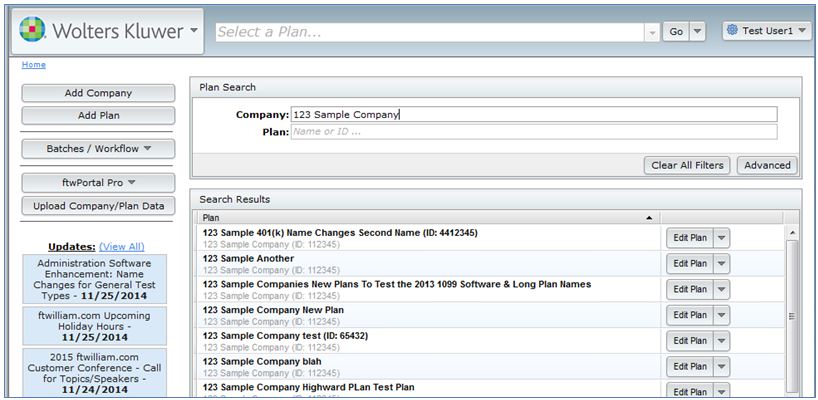
Home TopAfter log-in, you will be taken to the "Home" page where you can Add Company, Add Plan and search for a Company and/or Plan. First time ftwilliam.com users will need to add a company to get started. The 55AutoFill feature will import company information from 5500 form filings. All you need to do is enter the plan sponsor's employer identification number and basic plan and company information will automatically be imported for your use - even if you did not use our software in any previous year. (Patent pending). In addition, the "Home" page includes options to quickly navigate users to batch features, portal options, company data, email/technical updates and much more. Contact support@ftwilliam.com for more information if you are interested in the Upload Company/Plan Data feature.
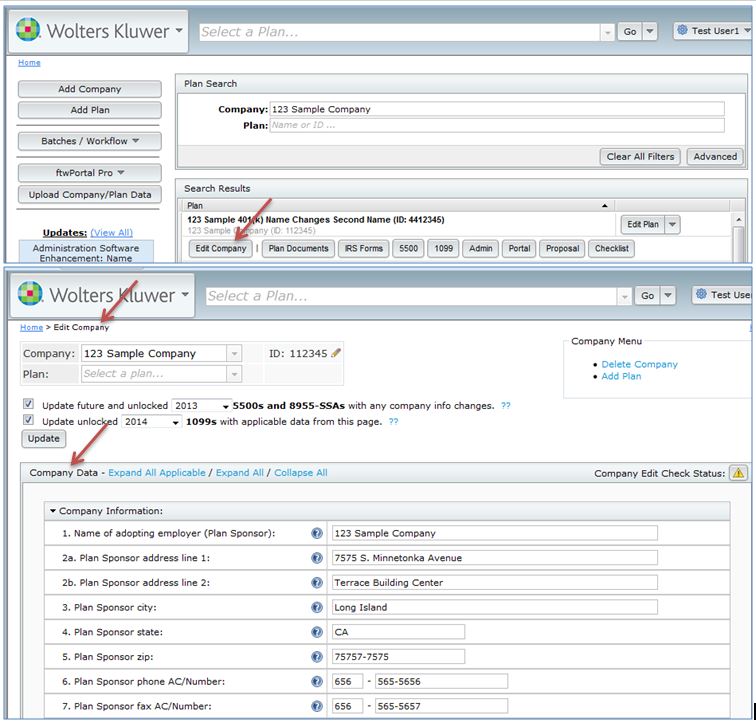
Edit Company. TopWhile on the "Home" screen, users will have the option to click on a Company/Plan to go to the Edit Company screen, or the various module(s) purchased. The user will also have the option to go to the Edit Plan screen. Note: First time ftwilliam.com users may need to add a plan to get started. The plan types you can add will depend upon your subscriptions with ftwilliam.com. Users can update Company/Sponsor information (including company/sponsor name, address, etc.) on this "Select Plan" page. Note there is a box at the top of the page that will also update any future and unlocked 5500s and 8955-SSAs with updated company/sponsor data for a particular 5500 filing year. Be sure to click on "Update" after checking the box.
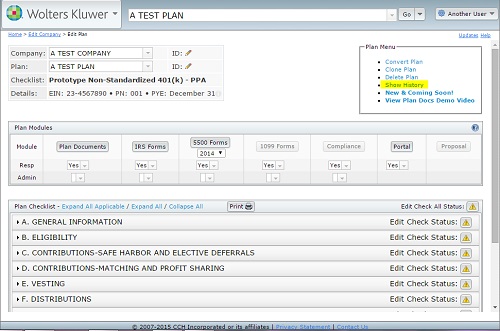
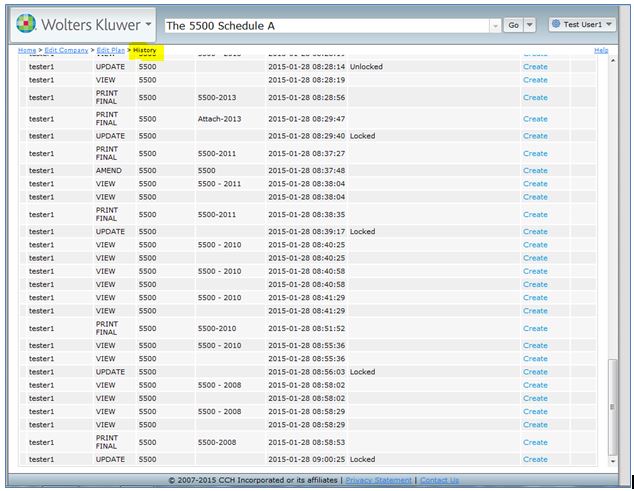
Edit Plan. TopOnce users have completed any necessary updates to the "Edit Company" screen, users should select a plan from the drop-down menu to be directed to the "Edit Plan" screen. The "Edit Plan" screen allows users to update the online checklist for plan documents, if applicable. Show History TopOne feature users may find helpful on the "Edit Plan" screen is the "Show History" link found below the "Plan Menu" near the upper-right corner of the screen. The link is highlighted in the image below. Users that click on the "Show History" link will be taken to the "History" screen shown below. The example below is for a plan with 5500 data only (no plan document is added for this plan; if a plan document was added, plan checklist changes would also be shown). If a user has edited or viewed the edit screen of the 5500 filing, the time and date will be noted on this screen as Viewed. If a user "Locks" a 5500 return/report, it will appear on the "History" screen as "Locked".
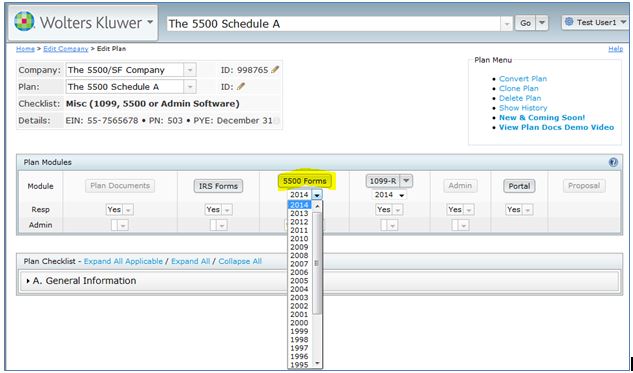
Change Plan Name TopUsers can change the Plan Name in the ftwilliam.com system from the "Edit Plan" screen. In the "Plan Checklist" box, click on "A. General Information". Users can edit the plan name on Lines 2a and 2b. The system automatically updates the checklist once the user clicks out of the fields. Go to 5500 Forms. TopAfter selecting a Plan from the "Home" screen and by clicking on "Edit Plan", the user will be directed to the "Edit Plan" screen. In the "Plan Modules" box, the user will be able to select the 5500 Plan Year (1988 - present) the user would like to work on before clicking the "5500 Forms" button. The screen shown below displays what it looks like if the user has an IRS Forms, 5500, 1099, Portal and Distributions subscriptions with ftwilliam.com. Depending upon the subscription(s) the user has with ftwilliam.com, the "Edit Plan" screen may appear differently.
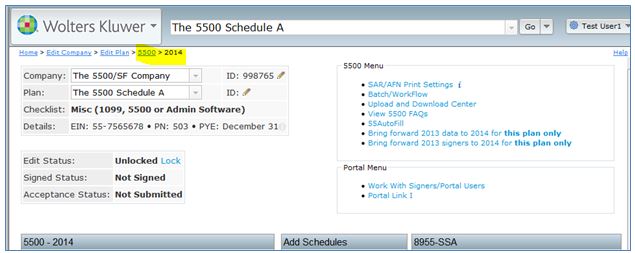
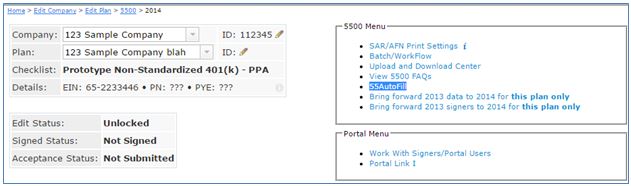
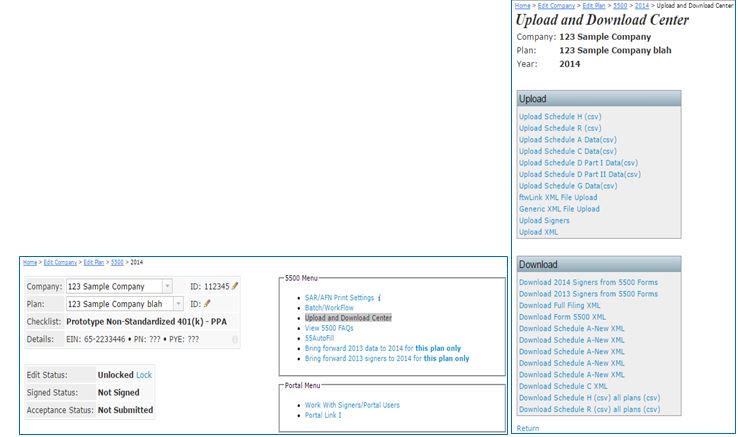
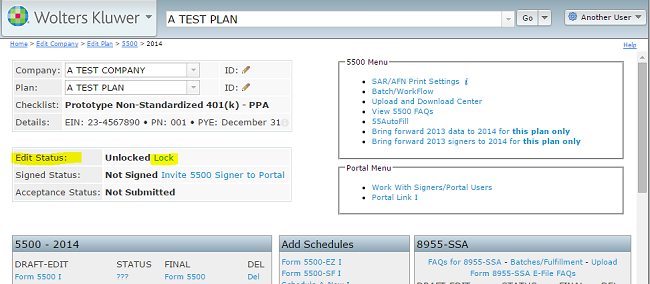
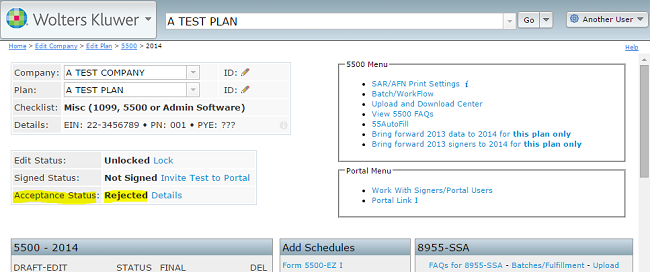
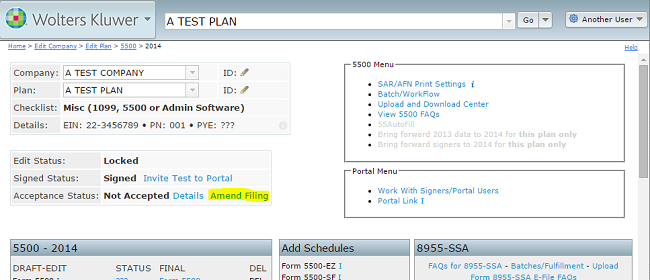
5500 > [Year] Screen. TopThe 5500 > [Year] screen is the "Homepage" for the 5500 return/report for the plan. Near the top of the screen you will find information showing the Company, Plan Name and checklist type for the plan.
Just below that is information regarding the Edit Status (Locked, Unlocked), Signed Status (Signed or Not Signed) and Acceptance Status from the DOL (Not Submitted, Submitted, Rejected - rare, In Process, Accepted, Not Accepted). These statuses are related to the signing and completing of a 5500 form discussed in more detail in the Signing a 5500 Filing section of this guide. Below the status information are links for 5500 Forms Settings and Batch Features (Work With Signers/Portal Users, Batch/WorkFlow, Portal Settings, and Portal Link). In the center of the screen are links to 5500 forms and schedules. See Completing 5500 Forms and Schedules for more information. In general, new users will first want to address Completing the 5500 Forms and Schedules, review the 5500 Forms Settings and Batch Features for the software and finally, Signing a 5500 Filing. |
In order to work with any form or schedule, you must first add the form to the "5500 - Year" box. There are a few ways to get started:
NOTE: You may also batch import data for all of your plans with 55Autofill. You will need to provide us with a list of EINs and we can 55Autofill all of your forms and schedules at one time (all forms and schedules available for that EIN will be uploaded). If you only want certain plans, then we need the EIN and plan number. If you already have plans set up on ftwilliam.com and you want to add 5500s, let us know and we can batch 55Autofill for those plans as well. Contact us at support@ftwilliam.com for this service (no additional charge).
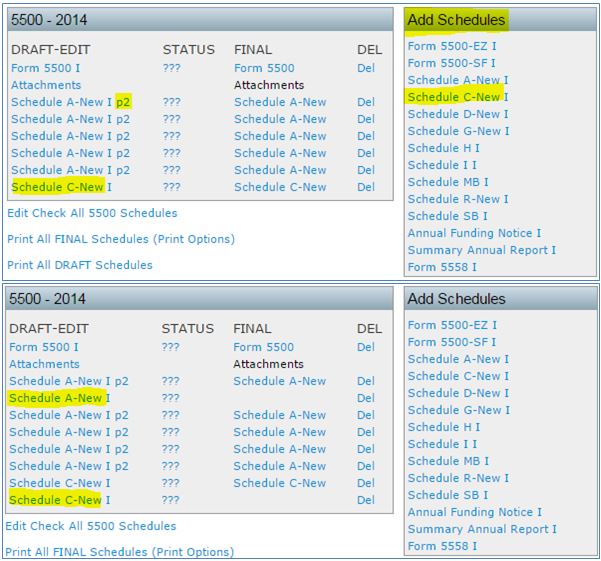
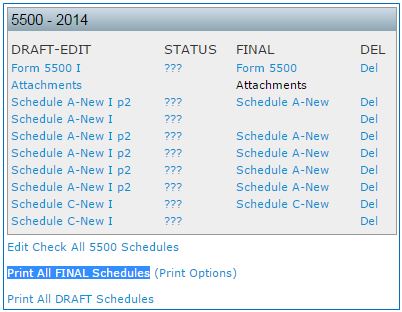
Schedule A filings work a bit differently, as you may
have multiple Schedule As and a particular Schedule A could have more than one page 2. To add a second schedule A, click on "Schedule A-New" within the "Add
Schedules" box. To add an additional page 2 to a Schedule A, click on the link "p2" next to that form under the "DRAFT-EDIT" heading / Active
schedules. You can give each schedule A, and each page of a schedule A, a different 5 character name as described above for other schedules.
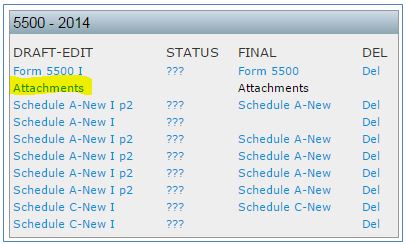
You may add attachments (Accountant's Opinion, etc.) to a
filing from the "Form 5500 - Year" screen by clicking on the "Attachments" link
towards the top of the "5500 - Year" box under the "DRAFT-EDIT" heading
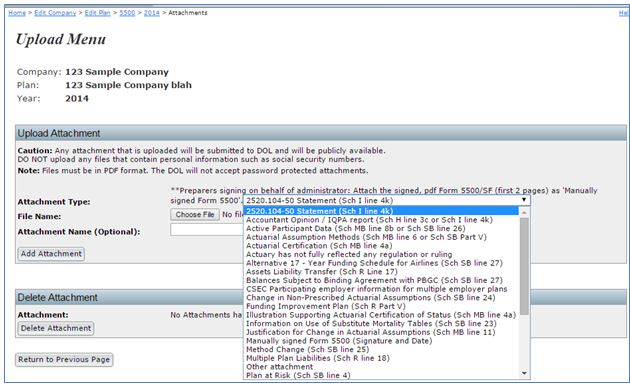
(just under the Form 5500/SF link once it has been added). You will be taken to the "Upload Menu" screen
where you will be given options to select the type of attachment, browse for the file and give the file a name. If there is not a
specific attachment type that matches what you are attaching, you may add the attachment as an "Other Attachment."
There are limits to the size of a filing that will be
accepted by the DOL. In general, scanned attachments should be saved as black
and white images. Resolutions of as low as 100 x 100 will typically
produce an acceptable image. A resolution of 300 x 300 creates files of
approximately 1 MB per page. There should not be any filings that need
to undergo exception processing due to EFAST2 limitations if
attachments are scanned at 300 x 300 or lower resolution.
If you upload an attachment in "Portrait" or "Landscape" format, the DOL
will receive the attachment in its entirety. When you return to the
"Form 5500 - Year" screen, you may review your added attachments by
clicking on "Attachments" within the "FINAL" column of the "5500 -
Year"
box.
To add a Summary Annual Report (SAR) or Annual Funding Notice (AFN), click on the link to the corresponding notice within the "Add Schedules" box. If you add the SAR, you will not have the option to add the AFN until you delete the SAR from the "DRAFT-EDIT" column. The reason you are unable to add both the SAR and AFN at the same time is because the AFN is similar to the SAR, but is only used for Defined Benefit Plans that are subject to the PBGC - all other plans should use the SAR. NOTE: The SAR/AFN checklists are populated with plan information at the time you click on the link under the 'Add Schedules' box. You should only add the SAR/AFN once all your schedules for the current year are completed.
Most information for the SAR can be obtained directly from the forms and schedules you already have completed. We still recommend opening the SAR Checklist to review and ensure the checklist is completed accurately. Some information cannot be obtained from the schedules and you will have to complete this information on the checklist itself.
Note that there are options in the Admin Menu (located at the top of most screens in ftwilliam.com):
| To enter information in a schedule,
click on the
schedule under the "DRAFT - EDIT" heading in the "5500 - Year" box (or
on the link under "Active Schedules" once you are already editing a
form/schedule). The actual speed to open a form/schedule is dependent
upon the speed of your Internet connection. If you are using a
high-speed Internet connection, the schedule should open immediately.
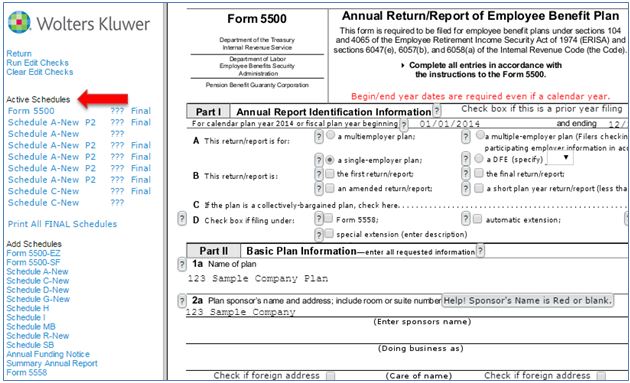
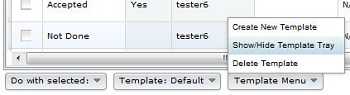
Once the schedule is open you may enter data as you
wish. Note that you can jump to different schedules and add schedules without having to return to the "Form 5500 - Year" screen (See red arrow above).
|
|
There is no need to click on update buttons in the software. Changes are automatically saved once they are entered.
You may perform edit checks on the data for each form/schedule at any time. There are a few different ways to run edit checks and review errors/warnings:
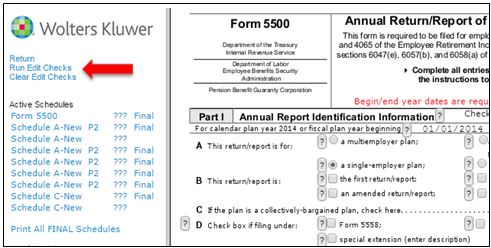
If you would like to complete the form without viewing the visual edit checks, you may click on "Clear Edit Checks" at the top left of the screen.
If you prefer to do all of your error checking for each form and schedule at once, click on the link under the "5500 - Year" box called "Edit Check All 5500 Schedules." This will open up a new web page and show you errors for all forms and schedules at once.
The edit checks have codes to help identify the level of the problem detected. Codes that begin with "FW" are edits that have been drafted by ftwilliam.com. All other edits have been supplied by the DOL. Edits are also coded as either "error" or "warning" (data likely has a problem). Please note that any filing containing a non-FW error will not be accepted by the DOL. We strongly discourage filing if there are errors/warnings appearing for a filing until you are certain that the filing is correct.
NOTE: The edit checks are NOT intended to check for the accuracy, correctness or completeness of every response.
Immediately before printing the final version of all the schedules, it is a good idea to rerun all edit checks even if all status codes are "OK". The status of the edit checks is reflected under the "STATUS" heading in the "5500 - Year" box.
The following is a description of the status codes:
Clicking on this link will generate all final forms and
schedules in
one pdf file for the plan. This will be the same download that a signer
must generate before he/she can electronically sign the filing. The pdf
file can be saved to your hard-drive (as can the signer from the
portal).
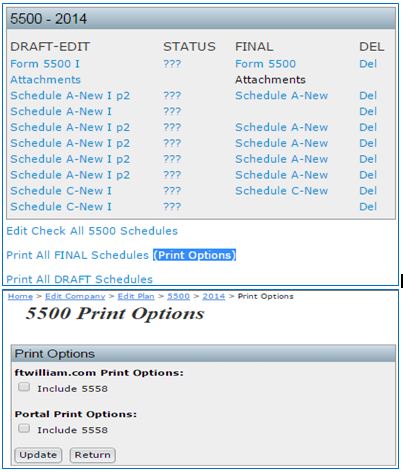
The "Print Options" link will give you options to include Form 5558 for purposes of printing from the "Form 5500 - Year" screen or via the Portal. Form 5558 will not be included in the printing of the filing by default.
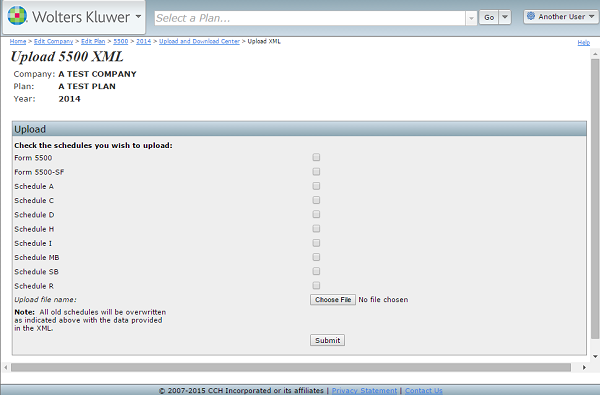
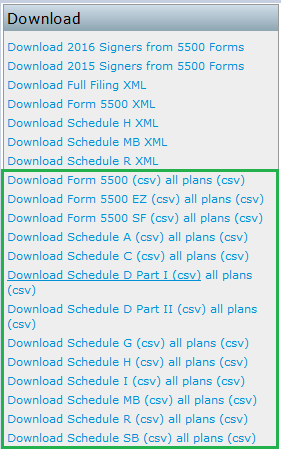
The Form 5500 Software includes several upload and download features. Click on the "Upload and Download Center" in the top-right under "5500 Menu" to open the "Upload and Download Center" page as shown below. Each feature can be accessed by clicking on the corresponding link on the page.
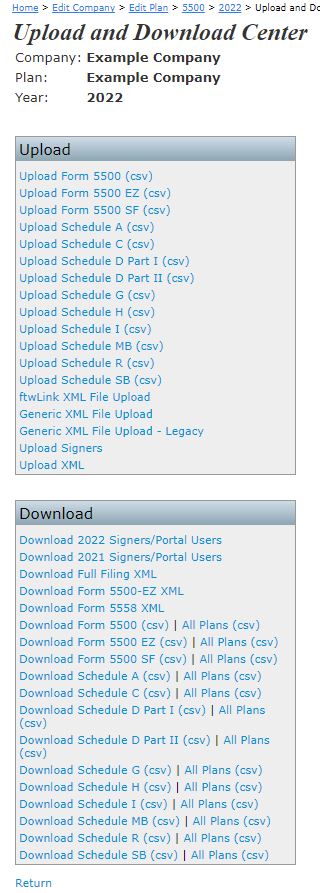
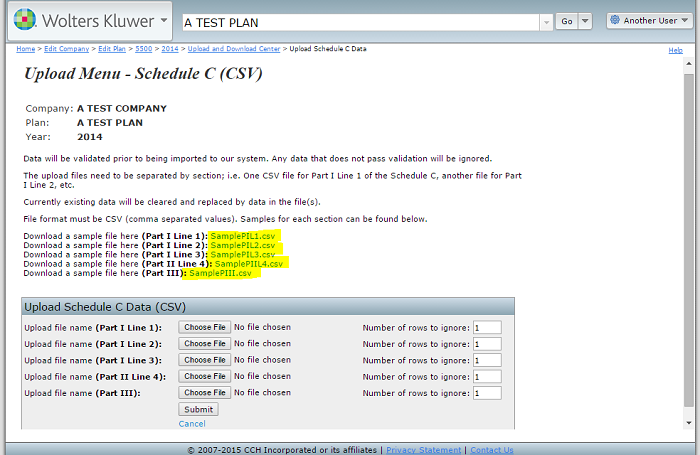
In most upload menus, you will be provided a sample file. Most uploads require that you complete a .csv file with all of your schedule information. Make sure that your headers in your .csv file match the headers in the sample spreadsheet provided.
Upload Features
Additionally, please note the following if you are adding multiple brokers to the spreadsheet: You will use the "Name1" column for the first name, "Name2" for the second, through the "Name7" column. If you have more than 7 brokers to add, you will enter his/her name into the "Name3" column in the next row and continue through the "Name7" column. Entries that begin in the "Name3" column below the first row will add an additional Page 2 to the Schedule A.
Once your spreadsheets are completed, you may then proceed
to uploading your data.
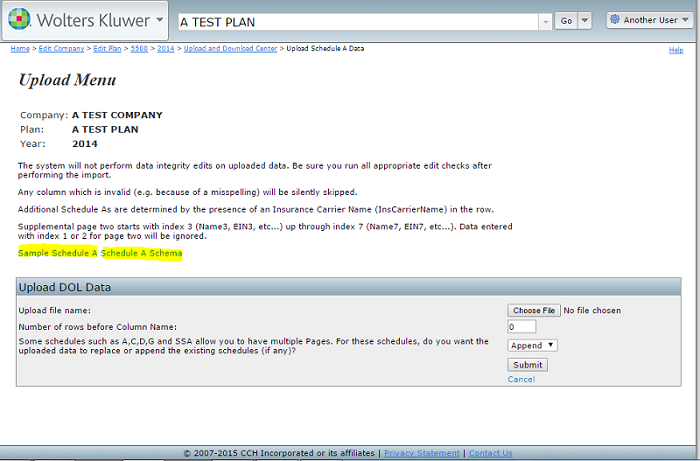
In the Schedule A upload menu, you will search for the file to upload and then enter the "Number of rows before column name." This entry will most likely be "0" unless you have entered a column for your own personal use. The software will not be able to read this information so you must tell it to ignore that particular row. Next, you will have to tell the software whether you are appending or deleting data. Appending means you are replacing the existing Schedule A data with the new/corrected data that you have uploaded. If you choose delete, the software will delete the existing data and replace it with the new data that you are uploading.
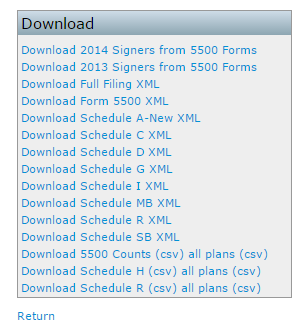
Download Features
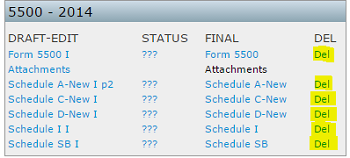
You may permanently remove a schedule by clicking on
the "Del"
link
next to the appropriate schedule under the "DEL" heading in the
"5500 - Year" box. Once a schedule is deleted, all of the information
it
contains will be permanently removed from the system.
You may permanently remove an Attachment by selecting
"Attachments"
under the "DRAFT-EDIT" column of the "5500 - Year" box. On the "Upload
Menu" screen,
choose the attachment you want to delete from the drop-down list within
the "Delete Attachment" box and
click "Delete Attachment." Once an Attachment is deleted, it is
permanently removed from the system.

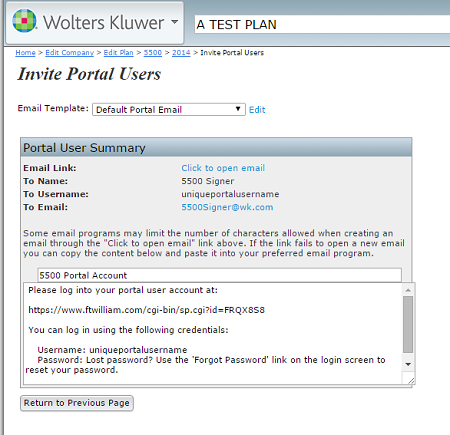
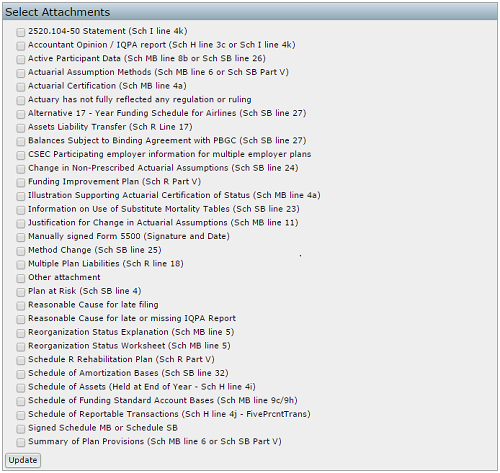
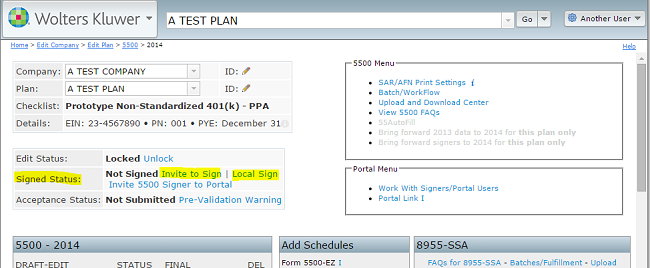
If you would like to invite users to the portal, you first must add a portal user under the Work with Signers/Portal Users link from the "Form 5500 - Year" screen. Once the portal user is added, you should have links available on the "Form 5500 - Year" screen next to the "Signed Status" line near the top of the screen. If the filing is not yet locked and users have proper permissions to view/print, edit or upload, the links to invite will appear as "Invite [Portal User's Name] to Portal". (Note that if the filing is not locked and a user(s) does not have permissions to view/print, edit or upload, then links to invite will only appear once the form has been locked).
Click on the link to "Invite [User name] to Portal" and the "Invite Signers/Portal Users" screen will appear with summaries of the user(s) name, username and email.
If you select "Yes" for "May Edit 5500" and select
"Yes" for
your signer
to upload attachments to the filing, you will be able to click on
"Select Attachments" to select which attachment(s) you would like your
client to upload in the portal. Once your client logs into the
portal, he/she will be able to view and/or delete the attachment after
uploading the attachment to the filing.
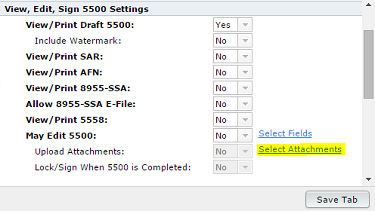
After clicking on "Select Attachments," you will be able to select
which
attachment(s) your client will be able to upload via the portal. Please
be sure to click "Update" after selecting your
attachment(s) to save the changes you have made.
Depending on your email settings, you will have different options to send and review the email:
Overview: There are two methods to sign a completed
5500; you
may either sign locally or via the portal.
Below we will discuss in more detail the aspects of the signing process. First, in order to sign, the "Edit Status" line must be updated to "Locked." We will further explain all the possible statuses for a filling (Edit Status, Signed Status and Acceptance Status). Next, we will explain in more detail how to set up the system for Signing via the portal and The Portal Signing Experience from your clients' perspective. Finally, we will discuss the Local Sign option in detail and explain Filing Statuses and Filings That Are Not Accepted.
Edit Status, Signed Status and Acceptance Status. Top
There are three statuses you should make note of at the top of the "Form 5500 - Year" screen that are described below. In addition, you may find options to invite users to the portal to sign or review/edit/upload attachments, depending upon the status of the plan and the settings selected under Work with Signers/Portal Users.

As you complete each task, your status will reflect any and all changes. The "5500 Workflow Grid" will also reflect all actions that have taken place for each specific plan.
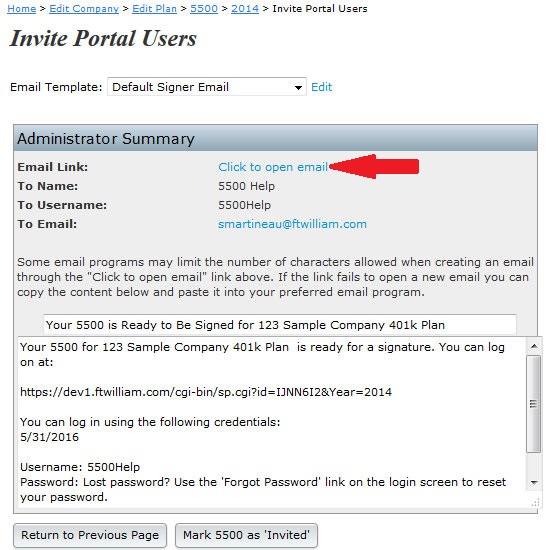
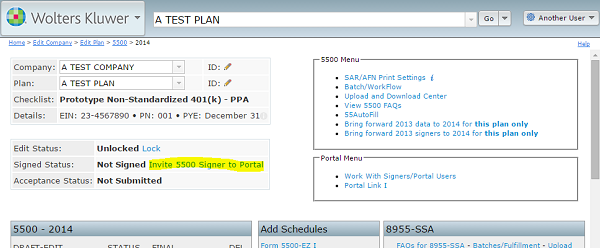
Once you would like to invite users to the Portal, you should first lock the filing and add signers under the Work with Signers/Portal Users link from the "Form 5500 - Year" screen. Once the form is locked and signers have been added for the plan, you will then have links available from the "Form 5500 - Year" screen next to the "Signed Status" indicator near the top of the screen. The link to invite will appear as "Invite [Portal User's Name] to Sign".
Click on the link to "Invite [User name] to Sign" and the "Invite Signers/Portal Users" screen will appear with summaries of the user(s) name, username and email.
Depending on your email settings, you will have different options to send and review the email:
Once a filing is locked and a signer is invited to sign, they access the portal via the link you send them with their username and password.
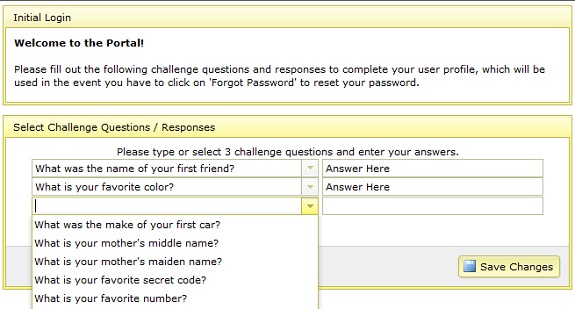
When your client logs in to the Portal for the first time, he/she will be prompted to answer three challenge questions and then will be
prompted to enter a new password. The password your client enters will be used by your client going forward, for as many years as he/she is
logging in and signing filings as your client.
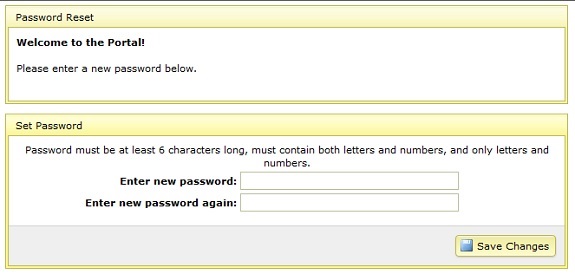
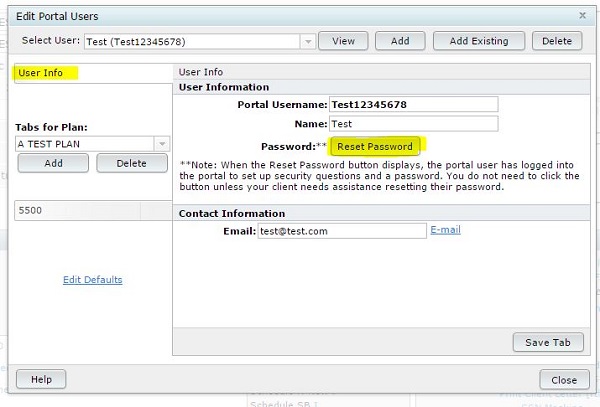
You provide a password for your client for the first time he/she logs into the Portal (this is done on the screen where a new portal user is added). Once the portal user has logged in and responded to security questions, the portal password data entry will be replaced with a link to reset the user's password via an email to the user (under "Work with Signers/Portal Users").
Clicking on "Reset Password" will send an e-mail to your client containing a link for him/her to follow. Following this link will automatically log your client into the Portal and he/she will be prompted to enter a new password. Your client also has the option to click on "Forgot Password" on the Portal log in screen to answer his/her challenge questions and create a new password in the instance where he/she no longer remembers his/her password. The "Reset Password" email is sent from a "donotreply@ftwilliam.com" address. Your client should receive the "Reset Password" email within a few minutes of the button being selected, but we do suggest having your client check his/her Junk or Spam folder to verify the "Reset Password" email has not been re-directed to either of those folders.
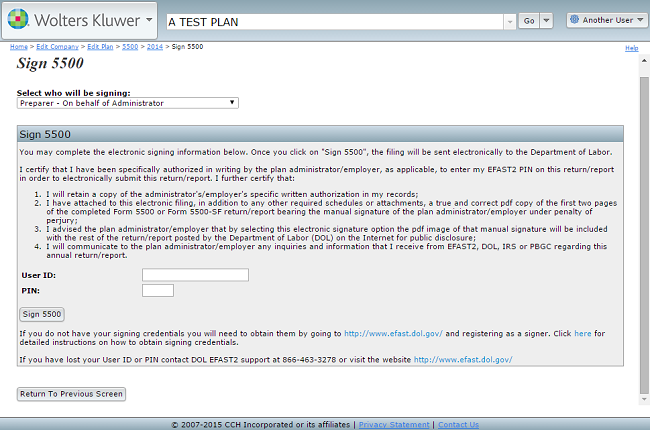
After clicking on the link to
"E-Sign
5500," signers will be taken to
the "Sign 5500 - Year" screen shown below.
The signer must first click the link to "Print 5500" before he/she will
be permitted to enter his/her DOL User ID and PIN to electronically
sign the
filing. There are also instructions to sign the paper version of the
filing with a wet signature and a suggestion to save the pdf file to
the user's hard-drive.
If you are using portal branding and you would like users to
send you a copy of the wet signature page, you may want to indicate
this or any other specific instructions within your portal branding.
The DOL User ID and PIN fields will not become editable until after
"Print
5500" has been selected. If your client logs into the portal to
print a copy of the filing, then logs back out without signing, he/she
will need to click on "Print 5500" again after logging back into the
portal to enable the DOL User ID and PIN fields.
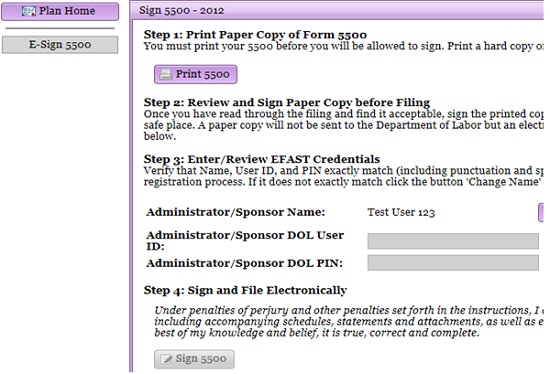
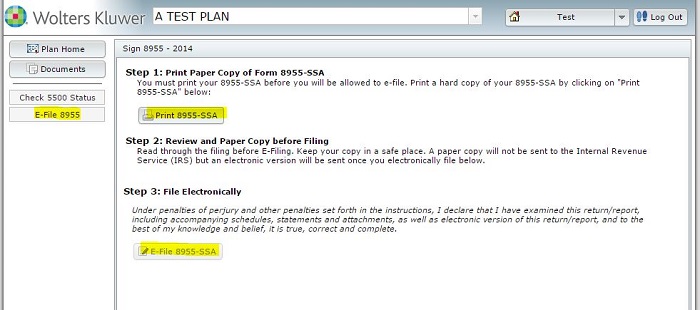
The "Sign 5500 - Year" page reads as follows:
Step 1: Print Paper Copy of Form 5500You must print your 5500 before you will be allowed to sign. Print a hard copy of your 5500 by clicking on "Print 5500" below: Note: If you have logged out and back in, you must print the 5500 again to unlock Step 3.
[Print 5500 Button]If you do not have your signing credentials you will need to obtain them by going to EFAST2 Registration and clicking on 'Sign in with LOGIN.GOV. Click here for detailed instructions on how to obtain signing credentials.
If you have lost your User ID or PIN contact DOL EFAST2 support at 866-463-3278 or visit EFAST2 Login (click on "Forgot UserID" or "Forgot Password").
Step 2: Review and Sign Paper Copy before Filing
Once you have read through the filing and find it acceptable, sign the printed copy with a "wet" signature. Keep your signed copy in a safe place. A paper copy will not be sent to the Department of Labor but an electronic version will be sent once you electronically sign below.
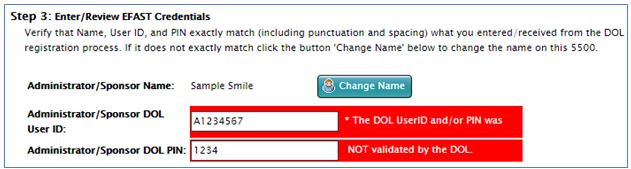
Step 3: Enter/Review EFAST Credentials
Verify that Name, User ID, and PIN exactly match (including punctuation and spacing) what you entered/received from the DOL registration process. If it does not exactly match click the button "Change Name" below to change the name on this 5500.
Administrator/Sponsor Name: [Change Name Button]
Administrator/Sponsor User ID:
Administrator/Sponsor PIN:
Step 4: Sign and File Electronically
Under penalties of perjury and other penalties set forth in the instructions, I declare that I have examined this return/report, including accompanying schedules, statements and attachments, as well as electronic version of this return/report, and to the best of my knowledge and belief, it is true, correct and complete.[Sign Button]
If your client receive the below message while attempting to sign, he/she will need to verify his/her User ID and/or PIN are being entered correctly:
Your
client will need to log into his/her profile on the DOL's website at
http:www.efast.dol.gov/ and verify the User ID and/or PIN that he/she
is using are correct. Once your client has verified his/her DOL
User ID and PIN, he/she will need to return to the "Signing
Screen," enter his/her DOL User ID and PIN and click "Sign 5500."
Populating
Signing
Page with Prior
Year Accepted Filing UserID and PIN. Top

If the portal user has not submitted a filing to
the DOL
via ftwilliam.com in a previous year, he/she will not see the option to
"Click here to use prior year ID and PIN" on the signing screen.
Additionally, if the portal user has submitted a filing to the DOL in a
prior year via ftwilliam.com, but the spelling of his/her name or
his/her username has changed from the prior year, he/she will not see
the option to "Click here to use prior year ID and PIN." You will need
to ensure your client's username and name exactly match what was used
in the prior year in order for him/her to see the "Click here to use
prior year ID and PIN" option on the signing screen. If he/she clicks
on the link, a window will open that reads:
Under penalties of perjury and other penalties set for in the instructions to the Form 5500, I declare that I am [Signer Name] and my DOL UserID is [User ID]. I would like my Administrator/Sponsor PIN to be populated below with the same four-digit number I entered in the prior year filing submitted to the Department of Labor.
To accept, click "OK," otherwise click "Cancel" and the User ID and PIN will not appear.
To enable or disable this feature, the Master User for the account will need to log into ftwilliam.com, click on the "Wolters Kluwer" logo, select "Administrative Tasks" and from the list, click on "Account Profile." Within the "Portal Options box," he/she will see "Allow 5500 Portal users to auto-populate DOL User ID and PIN from prior year." If this option is changed to "Yes," portal users will see the "Use prior year ID and PIN" feature on the portal signing screen. If the option is changed to "No," portal users will not see this feature on the portal signing screen. After selecting either "Yes" or "No," please be sure to click "Update" below the "Portal Options" box to save the changes that have been made.
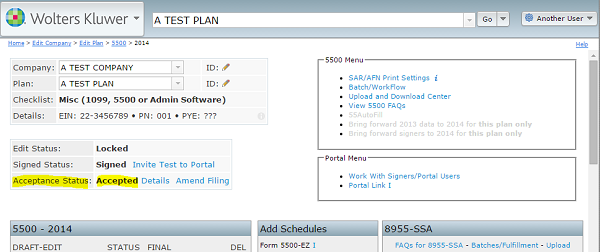
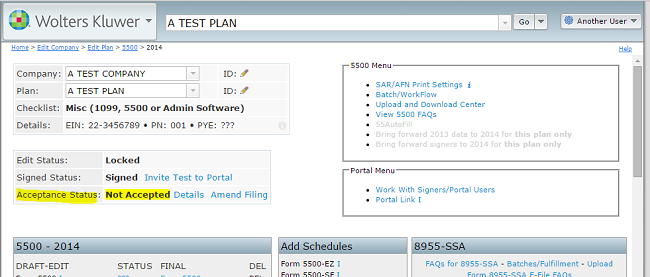
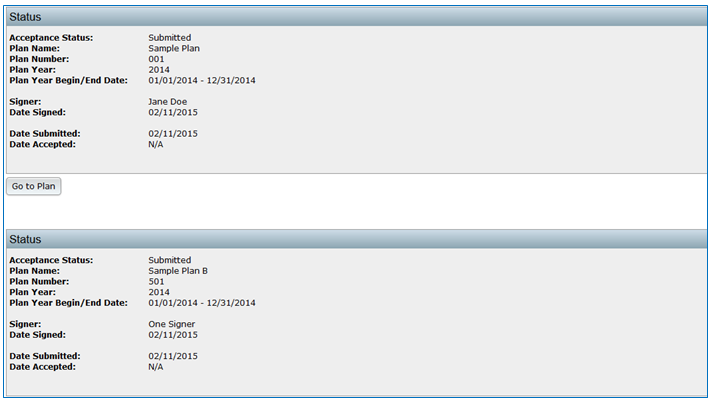
Once the signer electronically signs the filing (enters his/her User ID, PIN and clicks on "Sign 5500"), he/she will be taken to a status screen. The status screen, shown below, is an example of a plan that was "Not-Accepted" and will need to be amended to make the corrections. The statuses portal users/signers see are the same as those displayed on the "5500 > [Year]" screen within "Details".
The signer may always log back into the portal to
check
the status of the filing. The user will see a button as shown below to
"Check 5500 Status:"
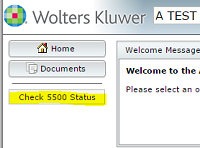
Once your client clicks on "Check 5500 Status," he/she will see the "Details" of the filing. Portal users may also click on "View as a PDF" to save a copy of the details to his/her hard drive.
Portal users will also have access to a "Portal User Help" guide by clicking on "Help" at the top of the portal screen. You can view the guide by clicking here. Note that the link to the user guide can also be removed by branding the portal if you wish.
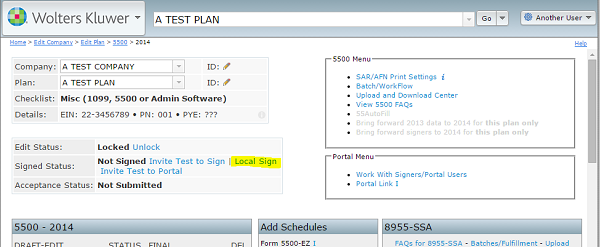
To access the local signing feature, the form
should be
final and the Edit
Status
must be "Locked".
Click on the link "Local Sign" on the "Form 5500 - Year" screen. To
learn about the Batch Local Sign option, click here.
Once you have clicked on the "Local Sign" link, a
"Sign
5500" screen will open with a drop-down box to select who will be
signing the form. The options are:
Once you select the appropriate option, more information will appear below depending upon the option you choose. Each is explained in more detail below.

I certify that I have been specifically
authorized
in writing by the plan administrator/employer, as applicable, to enter
my EFAST2 PIN on this return/report in order to electronically submit
this return/report. I further certify that:
If you do not have your signing credentials you will need to obtain them by going to https://www.efast.dol.gov/ and registering as a signer. Click here for detailed instructions on how to obtain signing credentials.
If you have lost your User ID or PIN contact DOL
EFAST2 support at 866-463-3278 or visit the website https://www.efast.dol.gov/
I certify that I have been specifically
authorized
in writing by the plan administrator/employer, as applicable, to enter
my EFAST2 PIN on this return/report in order to electronically submit
this return/report. I further certify that:
If you do not have your signing credentials you will need to obtain them by going to https://www.efast.dol.gov/ and registering as a signer. Click here for detailed instructions on how to obtain signing credentials.
If you have lost your User ID or PIN contact DOL EFAST2 support at 866-463-3278 or visit the website https://www.efast.dol.gov/
Verify that Name, User ID, and PIN exactly match (including punctuation and spacing) what you entered/received from the DOL registration process.
If "Name" does not exactly match click the button "Return to Previous Screen" and update the name on this 5500.
You must keep a signed copy of the 5500 for your records.
Under penalties of perjury and other penalties set forth in the instructions, I declare that I have examined this return/report, including accompanying schedules, statements and attachments, as well as electronic version of this return/report, and to the best of my knowledge and belief, it is true, correct and complete.
If you do not have your signing credentials you will need to obtain them by going to https://www.efast.dol.gov/ and registering as a signer. Click here for detailed instructions on how to obtain signing credentials.
If you have lost your User ID or PIN contact
DOL
EFAST2 support at 866-463-3278 or visit the website
https://www.efast.dol.gov/
Verify that Name, User ID, and PIN exactly match (including punctuation and spacing) what you entered/received from the DOL registration process.
If "Name" does not exactly match click the button "Return to Previous Screen" and update the name on this 5500.
You must keep a signed copy of the 5500 for your records.
Under penalties of perjury and other penalties set forth in the instructions, I declare that I have examined this return/report, including accompanying schedules, statements and attachments, as well as electronic version of this return/report, and to the best of my knowledge and belief, it is true, correct and complete.
If you do not have your signing credentials you will need to obtain them by going to https://www.efast.dol.gov/ and registering as a signer. Click here for detailed instructions on how to obtain signing credentials.
If you have lost your User ID or PIN contact DOL EFAST2 support at 866-463-3278 or visit the website https://www.efast.dol.gov/
Verify that Name, User ID, and PIN exactly match (including punctuation and spacing) what you entered/received from the DOL registration process.
If "Name" does not exactly match, click the button "Return to Previous Screen" and update the name on the Form 5500.
You must keep a signed copy of the 5500 for your records.
Under penalties of perjury and other penalties set forth in the instructions, I declare that I have examined this return/report, including accompanying schedules, statements and attachments, as well as electronic version of this return/report, and to the best of my knowledge and belief, it is true, correct and complete.
Both Signers must be present to submit this form 5500.
If you do not have your signing credentials, you will need to obtain them by going to https://www.efast.dol.gov/ and registering as a signer. Click here for detailed instructions on how to obtain signing credentials.
If you have lost your User ID or PIN contact DOL EFAST2 support at 866-463-3278 or visit the website https://www.efast.dol.gov/.
The following message will appear when
completing a
Local Sign if the DOL User ID and/or PIN do not match the DOL's records:
*The
ID and/or
PIN you entered was not Validated by the DOL
If you encounter the above message, you will need to verify the DOL User ID and PIN you have entered match the DOL's records before you are able to complete the filing process. To verify your DOL User ID and PIN, you will need to log into your profile at https://www.efast.dol.gov/.
Below
are the necessary steps to complete a Local Sign (The first five steps
are applicable if you sign as "Preparer - On behalf of Administrator"):
Filing Statuses and Filings that are Not Accepted. Top Once a filing has been signed by all required signers, the filing will be submitted to the DOL. Once a filing has been submitted, you should be able to view the acceptance status. There are four possible statuses:
To amend a filing, you will need to select "Amend Filing" next to the
"Details" link on the "Acceptance Status" line.
Once you have clicked on "Amend Filing,"
a screen to confirm your selection will appear with the following
warning:
Confirm
Click "Amend 5500" below to amend this Form 5500. Amending a 5500 will unlock the filing and allow changes to be made to all forms and schedules. Status checks will not be allowed until the amended filing has been submitted and you will no longer be able to check the status of the initial filing.
To continue, select "Amend 5500."
Before amending a filing, we would suggest ensuring you have a printed version of the prior filing for your records (there should already be a signed copy of the filing with your client). We would also suggest that you print a copy of the "Details," as once you click on "Amend Filing," you will lose the "Details" link.
Once you have clicked on "Amend Filing," the
filing
will be
unlocked and you will be able to make any necessary changes.
If
the filing was not submitted to the DOL originally through
ftwilliam.com, you will prepare the filing as if you were preparing a
new filing, but you will want to ensure you select the "Amended
Return/Report" box on the Form 5500 and make any necessary changes to
the filing. After running your edit checks, adding any attachments that
are needed and adding your signer to the filing under "Work with
Signers/Portal Users," you will lock the filing and invite your client
to sign. If you have the original DOL ACKID for the filing, prior to
inviting your client to sign, you may provide ftwilliam.com with the
ACKID and we will insert the ACKID into the schema of the filing so the
amended filing will replace the original filing on the DOL's website.
If you do not have the original ACKID this will not cause issues, there
will just be two records for this filing on the DOL's website.
The forms settings and batch features (Work With Signers/Portal Users, Batch/WorkFlow, Portal Settings and Portal Link) are available via links near the center of the "Form 5500 - Year" screen, just below the Acceptance Status line of the filing. Most of these links are also available via the "Admin Menu" link, found at the top of most screens after login.
Please note: The features discussed in this section are specific to the 5500 software on the ftwilliam.com system. If you would like to change settings for different users of the ftwilliam.com software, please see the "Admin Menu" at the top of most screens after you log in to the system (see the section above, Logging In).
Before setting up users for a particular filing and inviting signers via the portal, the "Portal Settings" that will be used as a default for all 5500 filings should be set up. If you are using ftwilliam.com 5500 software to both prepare and sign your own filing, you will likely not need to use most of the features discussed in this section.
Please note that not all ftwilliam.com 5500 software users will have access to all of the features described below. Some of the features are reserved for "Admin" level users of the software.
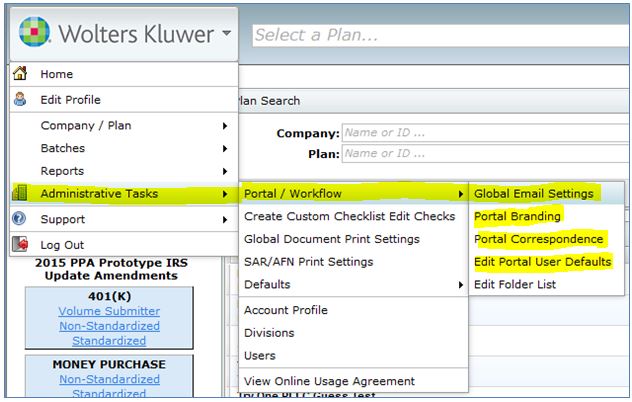
Portal settings can be accessed from the "WK Logo" drop-down menu at the top of most screens after log-in by going to Administrative Tasks > Portal/Workflow. Note: Some portal settings will affect all portals used on the ftwilliam.com system. In some cases, the portal settings will simply set up a default setting that can be customized for a particular filing. In other cases (Portal Branding, for example), the settings will affect all filings.
When designated admin users go to the "WK Logo"
drop-down menu at the top of most screens, Administrative Tasks >
Portal/Workflow users will see options to select Global Email Settings,
Portal Branding, Portal Correspondence, and Edit Portal User Defaults (Edit Contact Types if the subscribing to the full Portal suite). Each is
explained in detail below. Options vary depending on portal package
purchased.
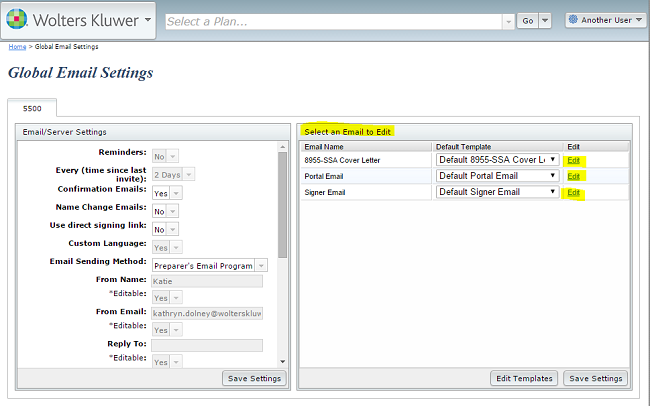
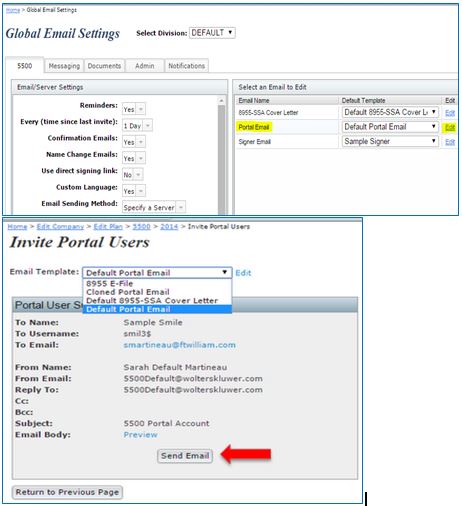
By going to the "WK Logo" drop-down menu at the top of most screens, Administrative Tasks > Portal/Workflow > Global Email Settings, users will have the option to work with Email Settings and Email Templates. Along the left-hand side of the screen are options to set up the email address that will be used to send invitations to the web portal and set up reminder emails for signers (discussed under Email/Server Settings below). Along the right-hand side of the screen, users may customize standard email correspondence that will be used as a default for all filings on the system (discussed under Portal Email Default Templates below).
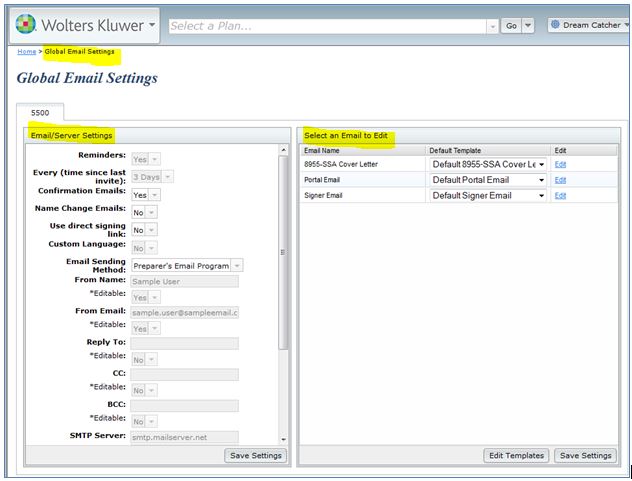
Be sure the 5500 tab is selected at the top of the screen to access 5500 software email settings if you have other ftwilliam.com portal software.
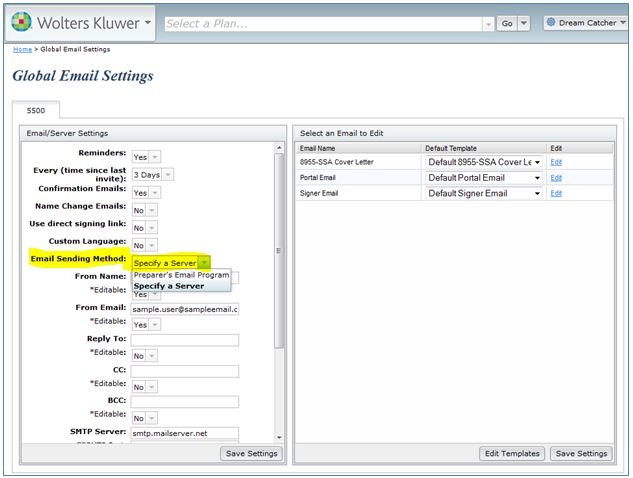
Some fields will allow users to select whether the field is editable. Marking a field as "Editable" will allow preparers to choose their own value for this field for a particular portal user.
When users select to
invite a portal user to the portal, a screen will appear to allow users
to
review the email before sending (it will not pop-up in the user's email
program as it would if users select the Preparer's Email Program
above).
This option allows for less ad-hoc editing of emails since users cannot
modify the email in the user's own email program.
Reminder Signer Emails.
This option is only available if users select "Specify a Server" under
the
"Email/Server Settings". Once the "Specify A Server" option is
selected, click "Yes" next to "Reminders" (see screen shot above).
Users
may then select the number of days for reminder emails to be sent. For
example, if users choose 3 days, a reminder email will be sent every 3
days until the filing is signed by the portal user. The reminder email
will be
the same
text as the original
signing invitation email except the end of the
subject line will include "(Reminder)."
| If your filing is "Not
Accepted,"
there is
a "Details"
link next to the status on the "5500 - Year" screen as shown below: Click on the "Details" link to view the reason(s) for the filing not being accepted by the DOL. |
|
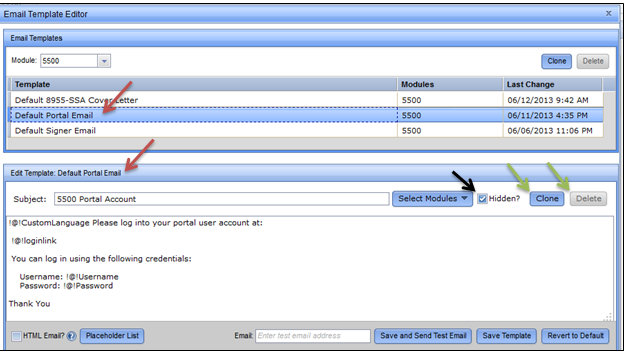
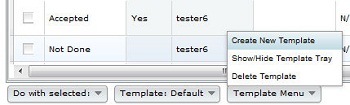
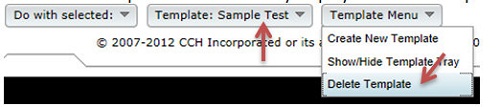
Once you've clicked on "Edit" for the Default Portal Email*, for example, you be able to update the Default Template; hide the Default Template; or Clone the
template. If you choose to hide a template, it will not display for admins when sending portal invites. Note:
You may not delete Default Templates (the button is grayed out for Default Templates). |
|
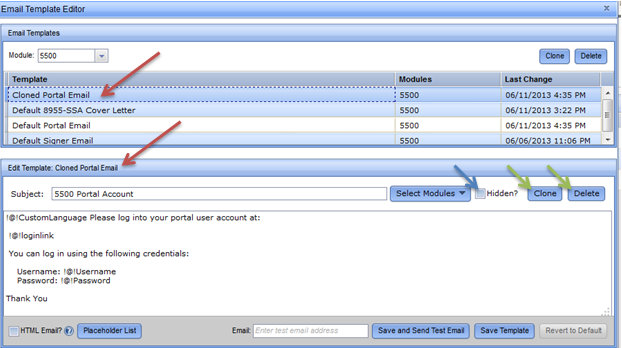
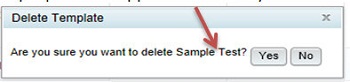
If you clone the Default Portal email, a pop-up box will appear for you to name the template. After you have named the template, you will
have the option to update the text; hide the template; clone the template; or delete the template. Once you are done, click on the "Close"button. |
Within the "Select an Email to Edit" box, you will now be able to select the template you would like to default to when
sending the Invite to Portal email. You will need to click on "Save Settings" towards the bottom of the screen. Note: the Default Portal
Email was hidden so it does not appear in the drop-down list.  |
Now that the default template has been selected, when
you go to the 5500 Module and click on the "Invite X to Portal" link,
the selected default from the Global Email Settings will appear in the
drop-down list. However, you are able to select another template type
for the standard Default Portal Email, any cloned Portal Email
Templates, Default 8955-SSA Email or any cloned 8955-SSA Email
Templates. 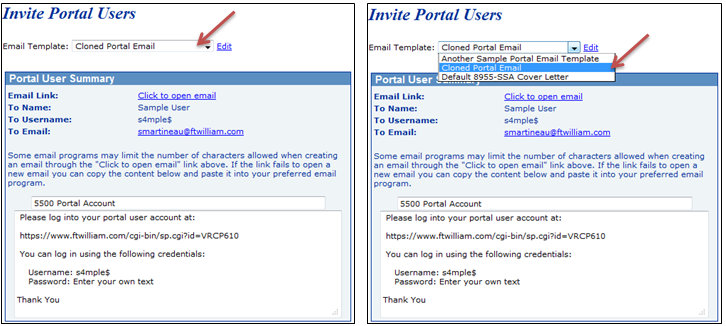 |
*Note: We have provided default email subjects and sample correspondence, but you may customize this language any way that you like. It is important that you leave the web-portal link and the "Username" and "Password" information in your email (if applicable); however, you may change the placement of these items if you wish. If after you have edited the text and wish to return to the default language, click on "Revert Email" and the body of the Invitation Email will revert back to its original text.
There are a few features of the standard emails described in more detail below:
"Dear Ms. Smith:
Thank you for the opportunity to assist you with your 5500 filing requirements this year."
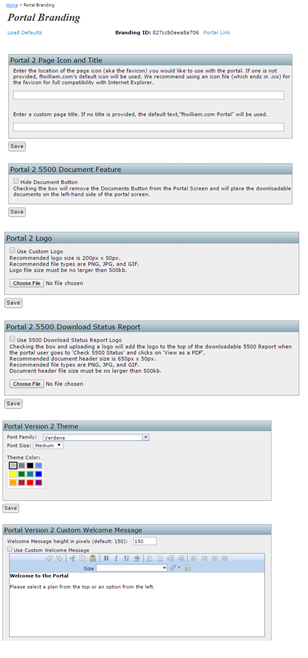
Portal Page Icon and Title: The favicon is the small image that is associated with the web page. If you currently have a favicon, you should be able to type http://yoursite.com/favicon.ico and the image will display. If not, you should speak with your web designer to help you set one up. The custom page title is the text that will appear as the title of the web page once your client logs into the portal. Portal 5500 Document Feature: Customers who only subscribe to the 5500 Software package will be able to select this option to remove the "Documents" tab from the main portal screen. When your client logs into the portal, he/she will see each document (e.g. 5500, SAR, 8955-SSA, 5558) listed on the left-hand side of the screen. Your client will need to click on each option to view/print the selected form.
Portal Logo: The logo you upload will be used in the upper-left hand corner of the portal. To see what the settings look like, you can click on the "Portal Link" at the upper-right hand corner of the "Portal Branding" screen (shown above). Portal 5500 Download Status Report: If you select this option, you may upload a logo that will appear on the 5500 Report your client downloads in the portal after clicking "Check 5500 Status" and selecting "View as a PDF." Please be sure and follow the recommended file sizes and types, as if you attempt to upload a file that is not PNG, JPG or GIF, or the file is too large, your client may be unable to view the 5500 Report in the portal. Portal Theme: You may select a font style, font size or color to further customize the portal. Portal Custom Welcome Message: You may enter a customized message that your clients will see upon logging into the portal. Footer Text: You may enter custom footer text here. If no footer text is provided, the default text, "© 2007-2023 CCH Incorporated or its affiliates" will be used. Portal Password Reminder Text: You may enter text here that will replace the default text of "Lost Password? Use the 'Forgot Password' link on the login screen to reset your password" that is displayed in the Invitation Email. The "Lost Password?" text appears in the Invitation Email after a portal user logs into the portal and updates his/her password. Oftentimes, portal users believe their password is lost based on seeing the default language that displays, so it may be helpful if you enter customized text such as the following: "Your password will no longer be displayed within this email. Please use the password you created after answering your three challenge questions. If you no longer remember your password, please contact your filing's preparer for further assistance or click on 'Forgot Password' to reset your password." Portal Mask Portal User Help: If you select this option, the "Help" button will be masked for your client on the portal log in screen, as well as when he/she is logged into the portal.
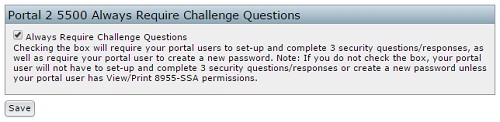
Note that we also offer a portal customization service for an additional fee. If you would like to take advantage of this service or would like more information, please call 800.596.0714 or email support@ftwilliam.com for more details. Portal 5500 Always Require Challenge
Questions:
Customers who only subscribe to the 5500 Software package will be able
to select this option to continue to require your portal users to
set-up and complete 3 security questions/responses, as well as require
your portal user to create a new password. Note: If
you do not
check the box, your portal user will not have to set-up and complete 3
security questions/responses or create a new password unless your
portal user has View/Print 8955-SSA permissions.
|
|
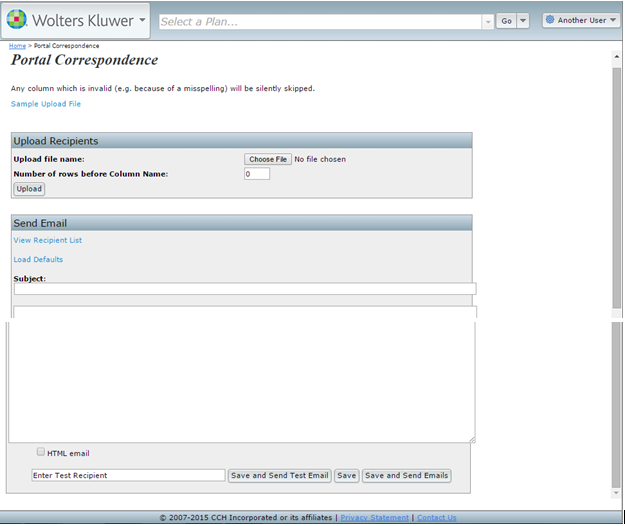
You have the ability to upload a spreadsheet with each of your customers' names, along with their email address. To upload a file, click on "browse", locate the file and indicate the number of rows to ignore before the column names. You should have a "Name" column and an "Email" Column. (If the first rows in your spreadsheet are "Name" and "Email", then there will be zero rows before Column Name). Once you've reviewed the recipient list by clicking on "View Recipient List" you may then batch email your clients. The default language we have prepared is shown below. Note that "!@!Name" will actually be filled in the with the name you upload in your excel spreadsheet. Please also note that we have prepared some of the instructions in a manner that will be suitable for the majority of plans but that there may be customizations you will want to make depending on your processes. If you make changes but would like to
revert
to the
default language,
see the link to "Load Defaults" on the Portal Correspondence page. |
Dear !@!Name,
The Department of Labor (DOL) is requiring that all 5500 filings be electronically filed and signed (known as "EFAST 2"). For the first filing year under EFAST 2, signers must register for filing credentials at the DOL website. Below are instructions for how to obtain filing credentials with the DOL.
Once this process is complete, you can continue to use the UserID and PIN provided by the DOL in future years. If a different person signs the 5500 filing in a future year, that person will have to register with the DOL signing credentials at that time. In addition, more than one person may obtain credentials to sign a 5500 form if more than one person may actually sign the filing.
5500 Form Signer Credential Procedures
There are several steps to registering at the DOL website. We suggest that you set aside approximately 15 minutes to complete the process. However, please keep in mind that it may take more than 15 minutes as there are several steps in the process. Please also note that the DOL may change the registration process - these are the steps as we understand them at the time of this email.
- Go to https://www.efast.dol.gov and select the link to register.
- You will be asked to read and sign a privacy statement.
- Complete your profile. You will be taken to a screen where you will be required to complete information that will serve as your profile (name, address, email and user type). Your user type is "filing signer."
- Challenge question. Once your profile information is complete, you will be asked to select a challenge question and answer. This is required and will be used to obtain your UserID and PIN in step 6.
- Confirm email. Check your email and click on the link provided in the email.
- Answer your Challenge Question. You will be asked the challenge question you set up earlier in the process.
- PIN agreement. You will then be asked to sign a PIN Agreement whereby you will agree not to share the PIN that is assigned to you.
- Signature Agreement. You will then be asked to agree to a more detailed "signature agreement".
- UserID and PIN. You will then be provided a UserID and PIN. We strongly suggest printing this page for your records.
- Password. The last step in the process is to create a password that will be assigned to the UserID and PIN that you were just provided. We suggest making a note of the password that you enter for your records. The password can be used with your UserID to obtain your PIN and/or log in to the DOL website in the future to change any profile information if necessary.
Click here for detailed instructions on how to obtain signing credentials with screenshots.
Once your Form 5500 and schedules have been prepared, we will contact you to complete the signing ceremony online. At that time, you will be required to enter the UserID and PIN that you received through the process outlined above.
Thank you for helping us make the transition from paper filing to EFAST 2 electronic filing as smooth as possible.
Sincerely,
Note that signers are often consistent from year to year so you will likely be able to "Add Existing" in future years (note the option to do this in batch mode discussed below). If you only want a user to view the current year information (and not see a prior year completed 5500 for example), you will need to add that user as an existing user to the current plan year and then go into the prior year and delete the user.
Bring forward [prior year] signers to [current year] for all plans. This function will move forward signer data to the current year for ALL PLANS. The process may take a few minutes. NOTE: If signer(s) have already been added for a given plan and year, the bring forward operation will silently skip said plan. There must also be signers from the previous year. The current year plan must be unlocked. Additionally, if your signer is designated to be signing as "None" in the prior year, he/she will not be brought forward into the current year.
You may also upload portal user information (portal username, password, email, signer status, etc.) for all your plans on the system at once. See information regarding "Upload Signers" in the Upload and Download Center.
Clicking on "Work with Signers/Portal Users" within the "Portal Menu" box will bring you to the "Edit Portal Users" screen where you will be viewing your user's profile. Below are the steps to follow to add/change user information:
Step 1: Click
"Add" if the user is not already in the system for that plan/plan year. More information
will appear as relevant for the user selected. If the user was on the system for
last year's filing or for a different filing on the system, you may
select "Add Existing" and choose the user from the list that will
appear.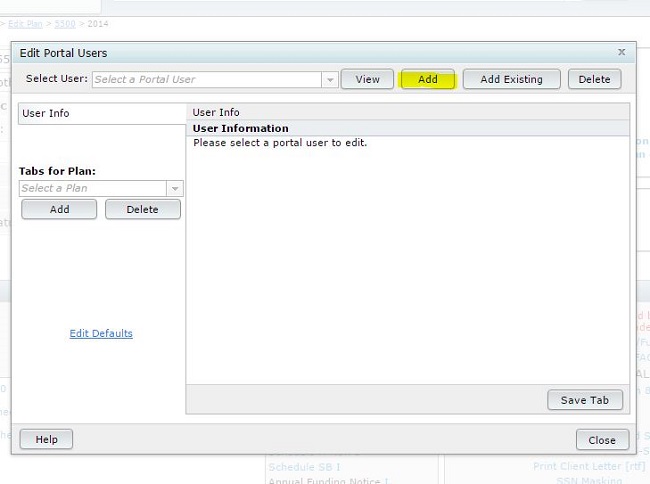 |
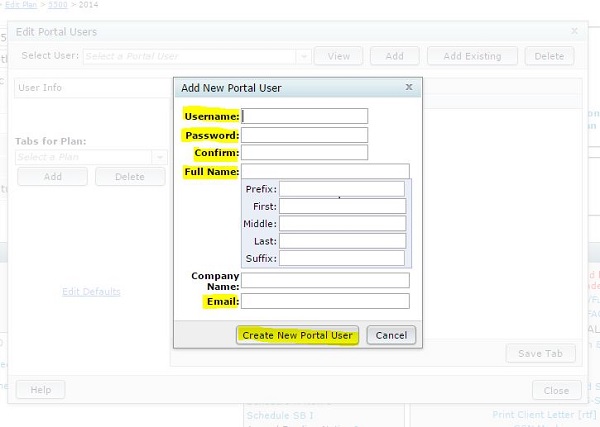
Step 2: Assign the user his/her relevant information. The fields highlighted in the image below are required when adding a new portal user. Each option will be discussed briefly below:
|
|
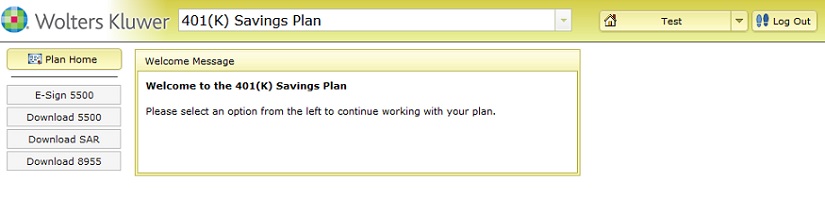
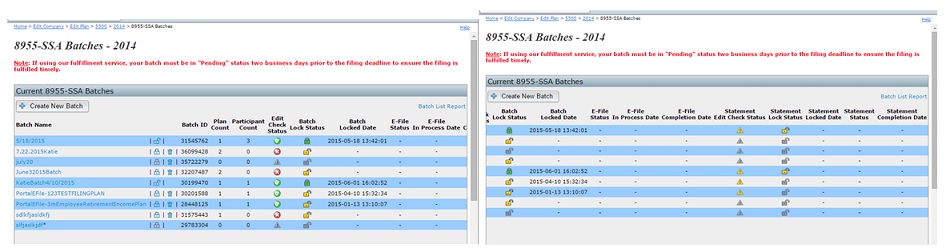
After the portal user has clicked on "E-File 8955-SSA," he/she will be directed to the main, portal "Welcome" screen and see the following message displayed in yellow:

From the perspective of the ftwilliam.com user, once the portal user clicks on "E-File 8955-SSA," a batch containing the plan will be created on the "8955-SSA Batches - YEAR" screen and will be displayed as "Locked" and "Pending," indicating that it has been sent to ftwilliam.com for fulfillment.
8955-SSAs E-filed by Portal Users are billed at $7.95/filing and are not subject to the $17.15 batch fee. Note: The $7.46 fee increased to $7.95 on 10/1/2025.

|
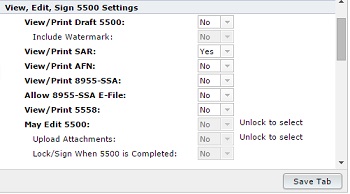
The image below shows what the portal will look like for a user with rights to view and print the SAR for a locked 5500 filing. |

As mentioned above, you may want to consider custom language that will personalize the email like that described below. Be sure to include a new line at the end of your custom language if you would like the standard email information to appear below the custom language as a new line.
"Dear Ms. Smith:Thank you for the opportunity to assist you with your 5500 filing requirements this year."
Step 3: Click on "Create New
Portal User"
(or
"Update" for
an
existing user) at the bottom of the page to save your changes.
Step 4:
Your user has been created and you will now see two different tabs
displaying on the left-hand side of your screen: "User Info" and
"5500." The "User Info" tab stores your client's portal
username,
name, password and email address.
Once you have users set-up and you would like to invite them to the Portal, you should have links available from the "Form 5500 - Year" screen on the "Signed Status" line near the top of the page. If the filing is not yet locked, the links to invite will appear as "Invite [Portal User's Name] to Portal". Note that if the filing is not locked and a user(s) does not have permissions to view/print, edit or upload then links to invite will only appear once the form has been locked.
Once the form has been locked, links should appear to "Invite [Portal User's Name] to sign". If the filing is not locked, please note that your client will not see the option to "E-Sign 5500" within the portal.
The different statuses and procedures are discussed in more detail in Signing a 5500 Filing, above.
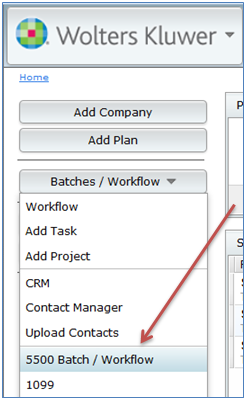
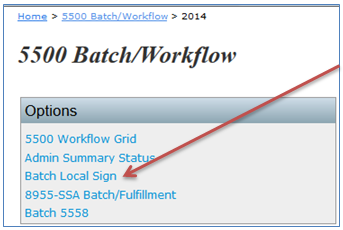
Clicking on the
"Batch/Workflow"
link within the "5500 Menu" box from
the "Form 5500 - Year" screen,
brings you to the "5500 Batch/Workflow" menu. You will see the
options to
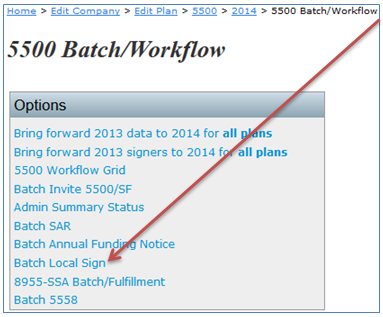
Bring forward (prior year) data to (current year) for all plans, Bring forward portal users to (current year) for all plans, Batch
Invite 5500/SF, 5500 Workflow Grid, Admin Summary Status, Batch SAR, Batch Annual Funding Notice, Batch Local Sign, 8955-SSA
Batch/Fulfillment, Batch 5558, and Batch Lock 5500.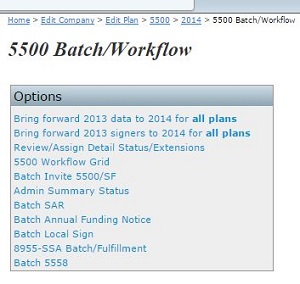
Each is discussed below. The options of Batch Invite 5500/SF, 5500 Workflow Grid and Admin Summary Status work similarly, as do the options to Batch SAR, Batch Annual Funding Notice, Batch 5558, and Batch Lock 5500, so those items will be discussed together. |
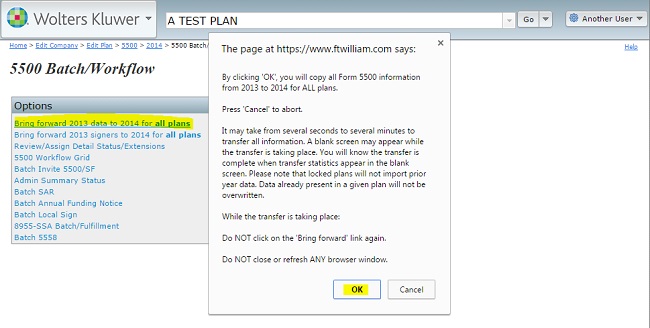
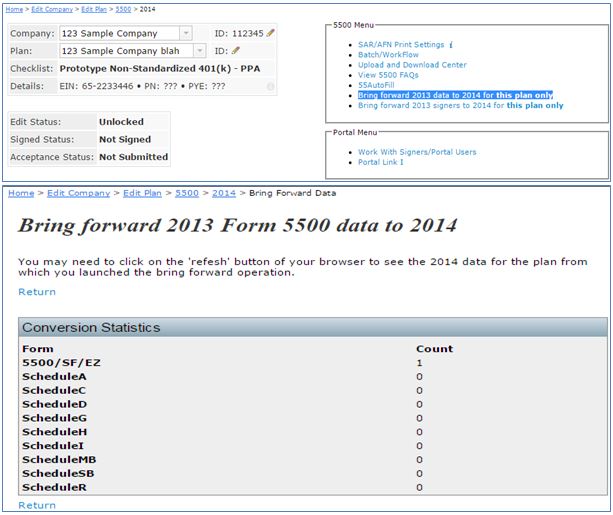
In addition, if you click on the option to "Bring forward (prior year) data to (current year) for all plans", the following warning will appear in a pop-up window:
When you are ready, click on "OK" to proceed. It may take a few minutes to process. Once the process is complete, you will be brought to the "Bring forward Form 5500 data to (current year)" screen with results shown indicating the number of forms updated.
This function will move forward signer data from the prior year to the current year for ALL PLANS. The process may take a couple minutes. NOTE: If signer(s) have already been added for a given plan and year, the bring forward operation will silently skip said plan. There must also be signers from the previous year. The current year plan must be unlocked.
The 5500 Workflow Grid (sample screenshot shown below) replaces all the functionality of the prior "Review/Assign Detail Status/Extensions" grid, but has a number of new features. You may access the 5500 Workflow Grid by clicking on the "Batch/Workflow" link from the "Form 5500 - Year" screen. It can also be accessed from the "Admin Menu" at the top of most pages after log-in under "5500 WorkFlow."
Note that not all options may be available for all ftwilliam.com 5500 software users.
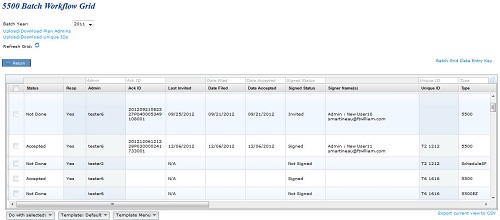 |
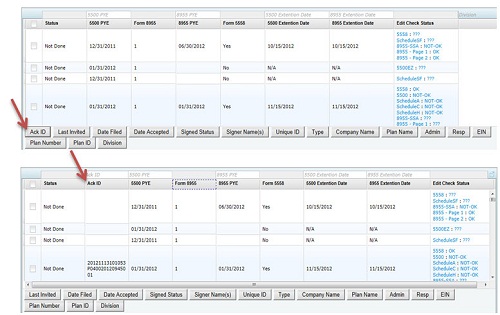
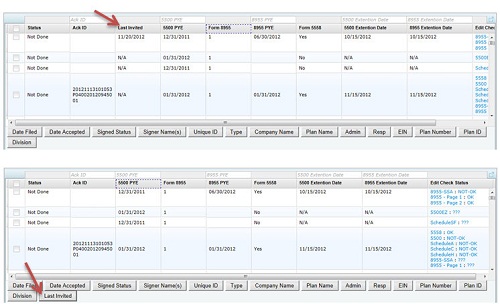
The 5500 Workflow Grid; Batch Invite 5500/SF; Admin Summary Status batch options will all open a data-entry grid resembling the view shown below. Each option displays different information and not all options may be available for all ftwilliam.com 5500 software users. You can access the grids by clicking on the "Batch/Workflow" link from the "Form 5500 - Year" screen.
Each option will allow you to view data for all the plans on the system at once in a grid format. Many grid fields will allow you to change/update items directly in the grid. Each grid will be explained in detail below.
Batch Invite 5500/SF. This feature allows a user to review the plans that have been locked to see if users have been invited and whether the plan has been signed. This will allow you to send batch emails as either an initial invitation to sign the filing or as a reminder if the signer has been invited but has not yet signed. In order to use this feature, you must have specified a server under Global Email Settings.
The data entry grid will display signers that have been set up as a portal user on plans that have been locked and will display the status of the filing (Not-Signed, Invited, or Signed). You are given the opportunity to select the user to send the email invitation to. When you are ready, click "Invite Selected," you will be asked to confirm and the email(s) will be sent out.
The text of the email will be the "Invite Signers Email" that you set up under Global Email Settings.
Admin Summary Status. This grid
allows a user
to review
the status of a particular administrator's assigned plans at a glance.
Each column will be explained in detail below:
Note that users can be assigned to a plan under the 5500 Workflow Grid option described above.
 The first step is to create a customized cover letter for your clients (SAR/AFN only). If you will be printing and mailing the letters, you may set options for the cover letter including font size and page margins. You may also generate a spreadsheet file for the purpose of generating mailing labels/envelopes by clicking on the "Print Address Labels Only (Single File)" link. The next step is to generate an edit list of client plans. This may be done by clicking on the link called "List Plans." After you have prepared your cover letter and have made sure that all plans requiring a SAR/AFN are showing up on the list of plans, you are ready to generate the respective document/form. See below for more information about each function of the Batch feature. |
After clicking on the "Edit Cover Letter Options" link, you will be presented with a pop-up window containing various options.
The Cover Letter will default to today's date, as indicated by the 'Today' setting under Letter Date. The date will be placed on the cover letter using the form: Month Day, Year. E.g. July 4, 2006. You may also set the date to an arbitrary value by selecting 'Fixed Date' from the drop down box. You will then need to enter a date in the Date field. The date entered into the Custom Date Field will be used in the cover letter exactly as entered.
The default font size for the cover letter is 10pt. You may change this value by selecting the appropriate font size from the drop down box. The available font sizes are: 8pt, 9pt, 10pt, 11pt and 12pt. The font size only affects the cover letter and does not alter the font size of other documents.
 "Yes" [Greeting Text] [Letter Recipient],
  "No" [Letter Recipient],
  "No greeting" [BLANK LINE]
The margins for the cover letter may be set in inches. The default margins are 1" for each side. You may set each margin independently of the rest in order to conform to the letterhead or paper you will be using to print the cover letter. In order to change a margin, you will need to enter a new margin value in the appropriate margin box. You may set margins as a fraction such as 1.33 or whole numbers like 1.
Sender
You may enter a name into the
"Email Sender (Friendly Name)" field to display a name that may be
recognizable to your client(s) upon receipt of the e-mail.
Additionally, you may enter the "Email Sender Address" and "Email Sender (Carbon Copy)" address into the appropriate fields. After
making changes, please be sure to click "Save" to save the changes that
have been made.
A default cover letter is provided for your use. You may modify the default cover letter or use your own text. The cover letter allows for several format codes, which alter the appearance of the document.
Format Codes are available which affect spacing (tab/paragraph) as well as lists (numbered).
In order to place a tab in the body of the letter, you will need to enter "[tab]" (without the quotes) at the location you wish a tab to appear.
In order to start a new paragraph in the body of the cover letter you will need to have an empty line in the body text.
You may also use a numbered list, by inserting "[numlist]" (without the quotes) into the cover body at the location you wish numbering to start. A numbered list is stopped by entering "[normal]."
After making changes to the cover letter options, you will need to click on the "Save" button. In order to close the cover letter options window, you will need to click on the "Cancel" button. You may close the cover letter page without saving your changes by clicking on the "Cancel" button.
Review Cover Letter (SAR/AFN only)
The review cover letter link may be used to generate a sample cover letter based on the cover letter options. After clicking on the "Review Cover Letter" link, a cover letter for the first plan will be generated and delivered as a Microsoft Word document.
After you are satisfied with the appearance of the cover letter, you may continue generating the SAR/AFN and cover letter documents for each plan.
Clicking on the "List Plans" link will open a pop-up window containing all of the plans that may qualify for the SAR/AFN. You will also have the option to download the list of plans into an Excel spreadsheet.
Edit checking will be performed on all SAR/AFNs. A summary will appear at the top of a new web page showing the results of the edit checks for each plan. If a plan has errors, you may click on the plan name to review the errors for that plan.
Clicking on the "Print Address Labels" link will create an Excel spreadsheet which contains the information necessary to print address labels or envelopes for the plans. It will be necessary to use the mail merge feature of Microsoft Word in order to print the address labels or envelopes. The Excel spreadsheet will contain the following columns:
Print Cover Letter Only (SAR/AFN Only)
A cover letter will be generated for each plan using the cover letter options. The cover letters will be returned as either a single Microsoft Word document, containing the cover letter for each plan or as a zip file which contains a separate Microsoft Word document for each plan.
A document/form will be generated for each plan and returned to the user as either a single Microsoft Word document, or as a zip file containing a separate Microsoft Word document for each plan.
Should the size of the generated document/form file exceed 750KB, it will be compressed into a zip file. This will generally only happen if you are generating documents/forms for a large number of plans.
After clicking on the "Print SAR/AFN Only" link it may take several seconds for the document to be generated. This is especially true for customers who are generating documents/forms for a large number of plans, as it takes about a minute to generate the SAR/AFN for 400 plans. After clicking on the "Print SAR/AFN Only" link, please be patient and do not cancel the operation or click the link again, as the document will be delivered to your browser as soon as it is generated.
Print Letter and SAR/AFN (SAR/AFN Only)
Both the Cover Letter and SAR/AFN will be generated for each plan and returned to the user as either a single Microsoft Word document containing all of the documents, or as a zip file containing a separate Microsoft Word document for each plan.
Should the size of the document/form file exceed 750KB, it will be compressed into a zip archive. This will generally only happen if you are generating documents for a large number of plans.
After clicking on the "Print Letter and SAR/AFN" link it may take several seconds for the document to be generated. This is especially true for customers who are generating documents for a large number of plans, as it takes about a minute to generate the SAR/AFN for 400 plans. After clicking on the "Print Letter and SAR/AFN" link, please be patient and do not cancel the operation or click the link again, as the document will be delivered to your browser as soon as it is generated.
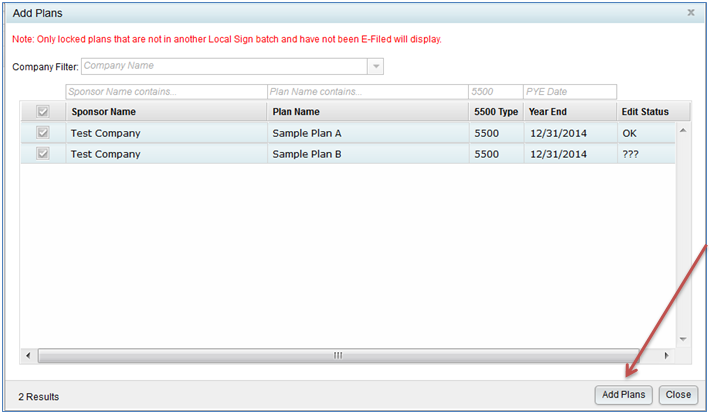
To utilize Batch Local Sign, only locked plans that are not in another Local Sign batch and have not been E-filed will display.
There are three options to access the batch local sign feature.
Note: The dropdown menus may vary based on what modules are active on your account.


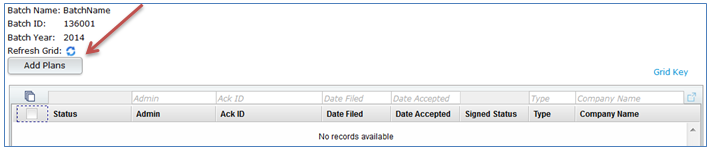
After clicking on "Create New Batch", a screen will appear to enter the batch name. Click "OK" to add the batch.

After clicking OK, you will be taken to the batch menu screen.
To add plans to the batch, click "Add Plans."
A screen will appear where the user can select which plan(s) to add to the batch. Once the user has selected the plan(s) to include,
click on "Add Plans".
The batch menu screen will automatically update to
reflect the plan(s) the user has selected for the batch.

Next, the user will check the plans they wish to
sign and submit to the DOL. Once checked, click on "Sign and Submit" under the
"Do with Selected" dropdown box at the bottom.

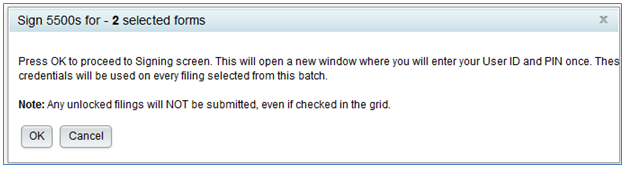
A screen will appear before proceeding forward
with filing. The user must click "OK" in order to move forward to the Signing screen.
Once the user has clicked OK, the next screen will
display with a drop-down box to select who will be signing the form.
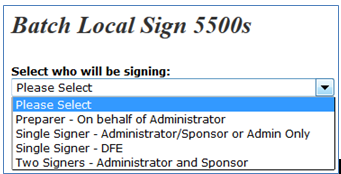
There are six options to choose from when selecting who the user will be signing as:
Once the user selects the appropriate option, more information will appear below depending upon the option the user chooses. Each is explained in more detail below.
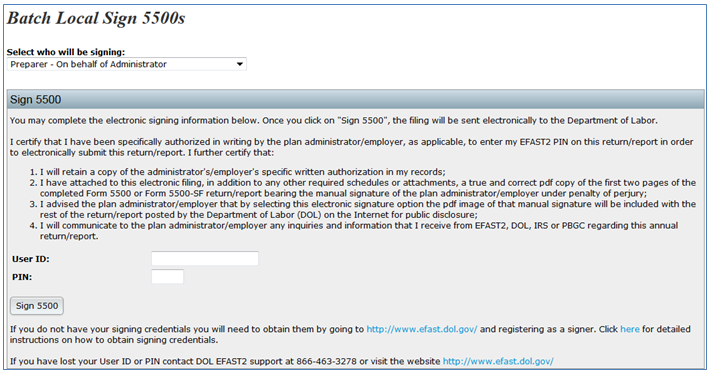
Preparer - On behalf of Administrator/ Sponsor or Admin OnlyTop
The "Sign 5500" screen that will appear reads as follows:
You may complete the electronic signing information below. Once you click on "Sign 5500," the filing will be sent electronically to the Department of Labor.
I certify that I have been specifically authorized in writing by the plan administrator/employer, as applicable, to enter my EFAST2 PIN on this return/report in order to electronically submit this return/report. I further certify that:
If you do not have your signing credentials you will need to obtain them by going to http://www.efast.dol.gov and
registering as a signer. Click here for detailed instructions on how to obtain signing credentials.
If you have lost your User ID or PIN contact DOL EFAST2 support at 866-463-3278 or visit the website https://www.efast.dol.gov/.
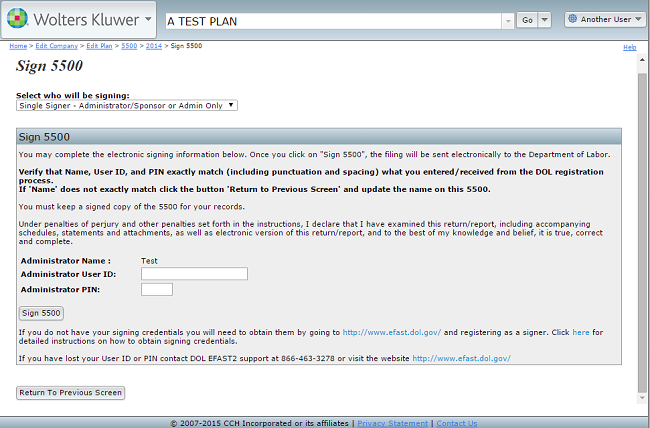
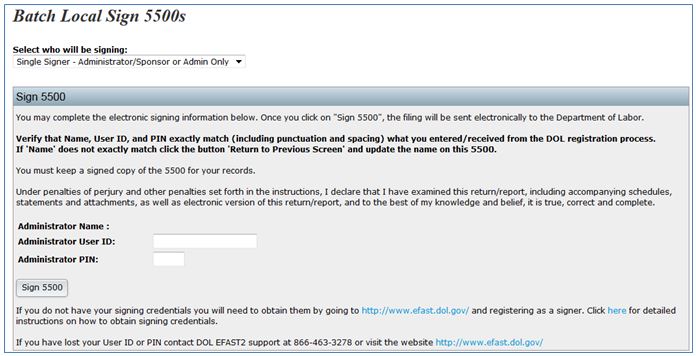
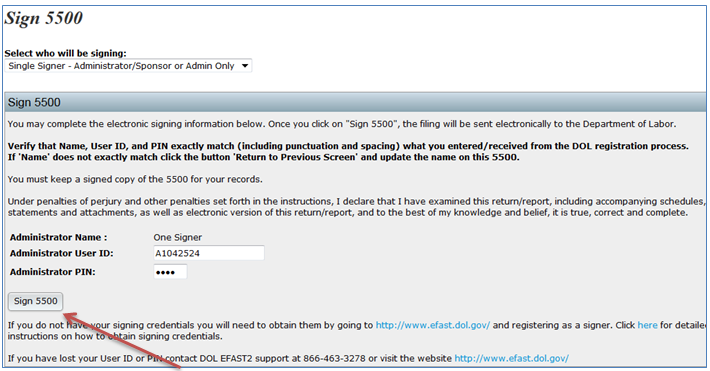
Single
Signer -
Administrator/Sponsor or Admin Only. Top
The
"Sign 5500" screen that
will appear reads as follows:
You may complete the electronic signing information below. Once you
click on "Sign 5500", the filing will be sent electronically to the
Department of Labor.
Verify that Name, User ID, and PIN exactly match (including punctuation and spacing) what you entered/received from the DOL registration process.
If 'Name' does not exactly match click the button 'Return to Previous Screen' and update the name on this 5500.
You must keep a signed copy of the 5500 for your records.
Under penalties of perjury and other penalties set forth in the instructions, I declare that I have examined this return/report, including accompanying schedules, statements and attachments, as well as electronic version of this return/report, and to the best of my knowledge and belief, it is true, correct and complete.
If you do not have your signing credentials you
will
need to
obtain them by going to https://www.efast.dol.gov/ and
registering as a
signer. Click here
for detailed instructions on how to obtain signing credentials. If you
have lost your User ID or PIN contact DOL EFAST2 support at
866-463-3278 or visit the website https://www.efast.dol.gov/.
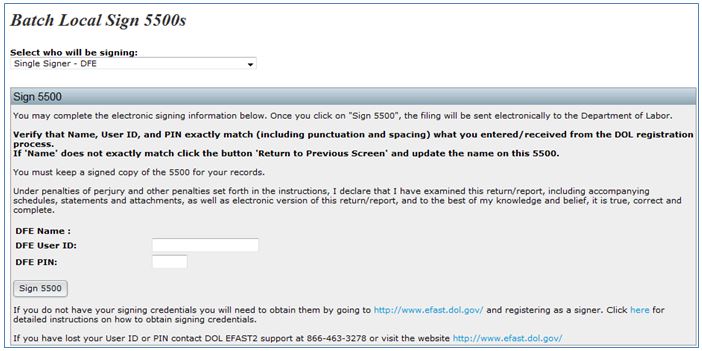
Single
Signer - DFE. Top
The
"Sign 5500" screen that will appear reads
as follows:
You may complete the electronic signing information below. Once you
click on "Sign 5500", the filing will be sent electronically to the
Department of Labor.
Verify that Name, User ID, and PIN exactly match (including punctuation and spacing) what you entered/received from the DOL registration process.
If 'Name' does not exactly match click the button 'Return to Previous Screen' and update the name on this 5500.
You must keep a signed copy of the 5500 for your records.
Under penalties of perjury and other penalties set forth in the instructions, I declare that I have examined this return/report, including accompanying schedules, statements and attachments, as well as electronic version of this return/report, and to the best of my knowledge and belief, it is true, correct and complete.
If you do not have your signing credentials you will need to obtain them by going to https://www.efast.dol.gov/ and registering as a signer. Click here for detailed instructions on how to obtain signing credentials.
If you have lost your User ID or PIN contact DOL
EFAST2
support at 866-463-3278 or visit the website https://www.efast.dol.gov/.
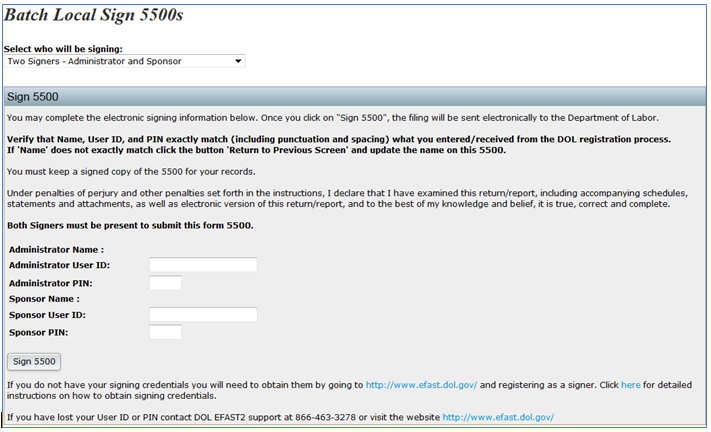
Two
Signers - Administrator
and
Sponsor Top
The "Sign 5500" screen that will
appear reads as follows:
You may complete the electronic signing information below. Once you
click on "Sign 5500", the filing will be sent electronically to the
Department of Labor.
Verify that Name, User ID, and PIN exactly match (including punctuation and spacing) what you entered/received from the DOL registration process.
If "Name" does not exactly match, click the button "Return to Previous Screen" and update the name on the Form 5500.
You must keep a signed copy of the 5500 for your records.
Under penalties of perjury and other penalties set forth in the instructions, I declare that I have examined this return/report, including accompanying schedules, statements and attachments, as well as electronic version of this return/report, and to the best of my knowledge and belief, it is true, correct and complete.
Both Signers must be present to submit this form 5500.
If you do not have your signing credentials, you will need to obtain them by going to https://www.efast.dol.gov/ and registering as a signer. Click here for detailed instructions on how to obtain signing credentials.
If you have lost your User ID or PIN contact DOL
EFAST2
support at 866-463-3278 or visit the website https://www.efast.dol.gov/.
Once the user has selected who they are signing as
and
entered
the correct DOL credentials, the user can click on "Sign 5500".
After clicking on "Sign 5500", the user will be
taken to
a
Status screen.
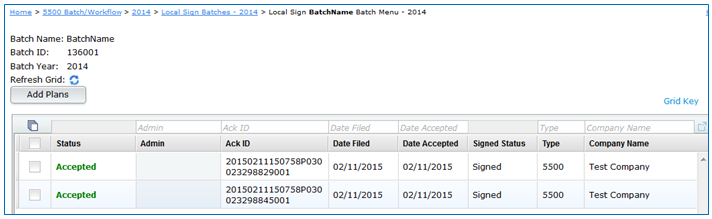
Once the user navigates back to the "Local Sign Batches - 20XX" screen, and clicked on the batch name, the user will see the
updated status for each individual plan.
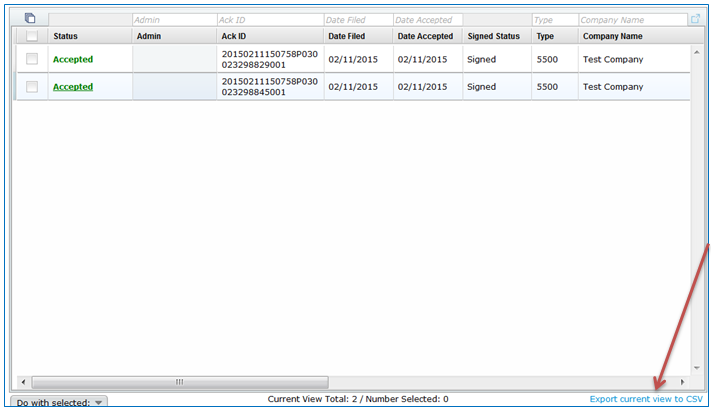
To view a spreadsheet of the plans that are filed, the user can click on "Export current view to CSV" below the grid.

Tip. If you only want plans with a specific plan year end in your batch, you could title it 12/31 or 12/31/20XX.
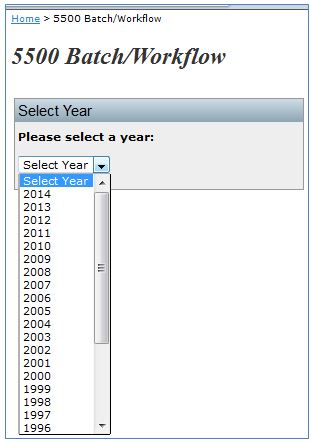
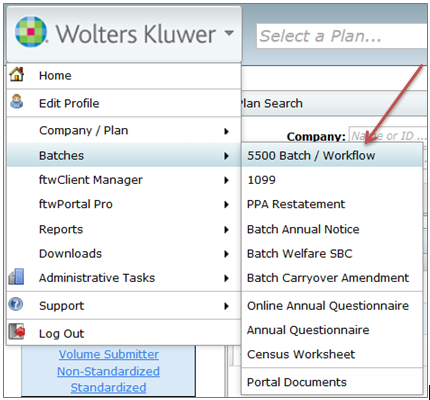
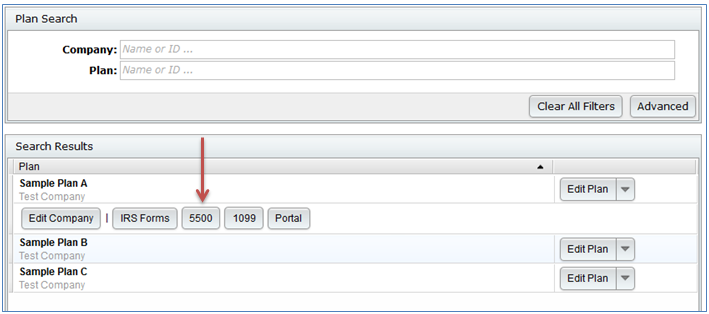
The 5500 module allows for users to mass edit check as well as lock or unlock 5500/EZ/SF filings. To access this feature, navigate to the Wolters Kluwer Logo> Batches> 5500 Batch/Workflow.
From here, select the applicable year from the dropdown menu. Please note, this feature is only available starting with the 2021 form year. Once the year is selected, click on “Batch Lock 5500 “.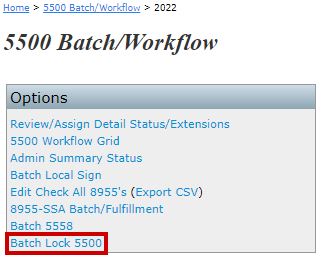
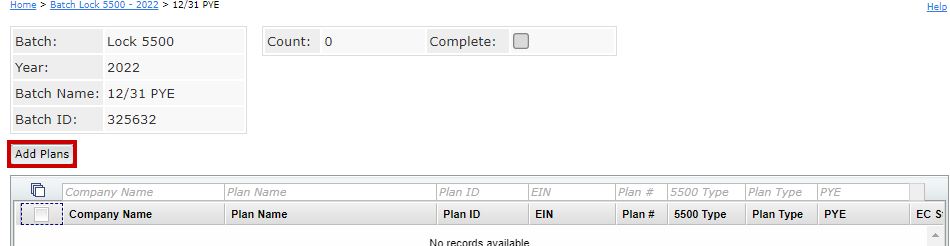
From within the Batch Lock 5500 screen, select the “Create New Batch” button from above the grid and enter in a naming convention for your batch.

This will redirect to the specific batch where users are able to add plans by selecting the “Add Plans“ button above the grid.
NOTE: The Batch screen is year specific and will only allow you to create batches on the selected form. For example, if the 2022 year was selected from the Batch Lock 5500 menu, only filings populated on a 2022 form, that have not already been filed, and have the responsibility field as ‘Yes’ on the Edit Plan screen will be available to add to the batch.
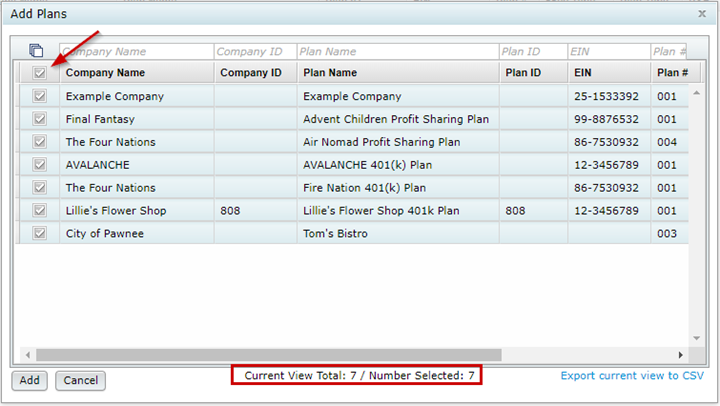
The “Add Plans” window allows for user to filter plans by one or more search entries above each column header.
Users may select individual plans or click on the checkbox to the left of the Company Name header to select all available plans. (If a filter is utilized, the select all will only select the plans in the filtered view). The current plans available and the number of selected plans populate at the bottom of the window.
Once the plans are added to a batch, user are able to run edit checks, lock/unlock the filings, or remove the plans from the batch through the “Do with Selected” option at the bottom of the screen. To use these features, select the checkbox to the left of each plan, or select all plans in the batch by selecting the checkbox to the left of the Company Name header.
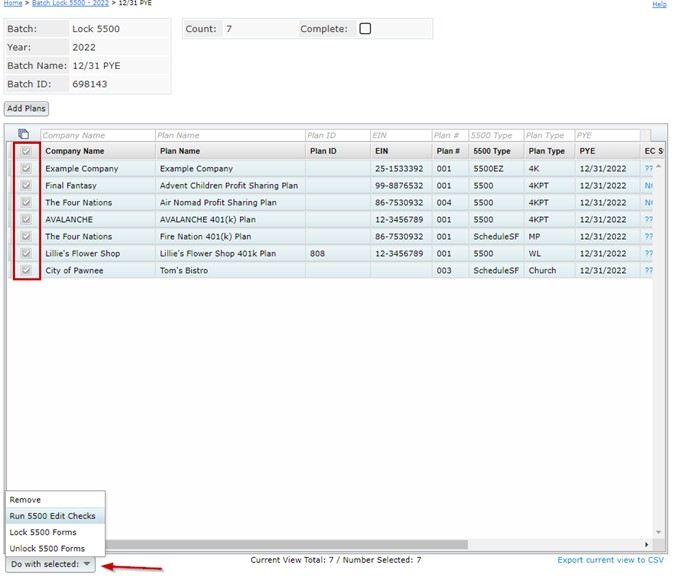
When an option is selected from within the “Do with Selected” menu, a pop-up window will populate confirming the request. When running edit checks or locking/unlocking the forms, a progress bar will populate. Once completed, edit checks and lock statuses may be viewed from within the grid by scrolling to the right:

Clicking on the hyperlinks under the Edit Check will redirect you to the specific plans edit checks and draft forms to make the alterations. Once alterations are completed and the forms are locked, you can mark the batch completed on the individual batch screen or from within the batch landing screen. Note: This is for record keeping purposes only and does not stop users from making further alterations to the batch or to plans within the batch but will prevent the batch from being deleted.
To complete an 8955 -SSA, look for the "8955 - SSA" box in the upper-right hand corner of the "Form 5500 - Year" screen (shown below). Along the top of the box are options for IRS
FAQs for 8955 - SSA, "Batches/Fulfillment" (allows you to upload data for multiple plans) and "Upload." In the middle of the box are options to help you complete
the 8955 - SSA for the particular plan and filing year and along the bottom of the box are options to complete the statement data.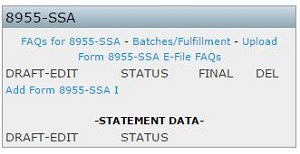 |
There are three ways to
add
the
Page 1
data:
If you click on "Add 8955-SSA" most of the basic plan information should populate Page 1 from the Form 5500/SF (or the basic company information on the "Select Plan" screen if no Form 5500/SF is added). While in the draft form, you will be able to add page 2s by clicking on "p2" (either from the "Form 8955 - SSA" box or along the left-hand side of the page when the form is open). Page 2 will contain the participant data and there is no limit on the number of Page 2s a form may have. To add multiple Page 2s, click on "p2" again.
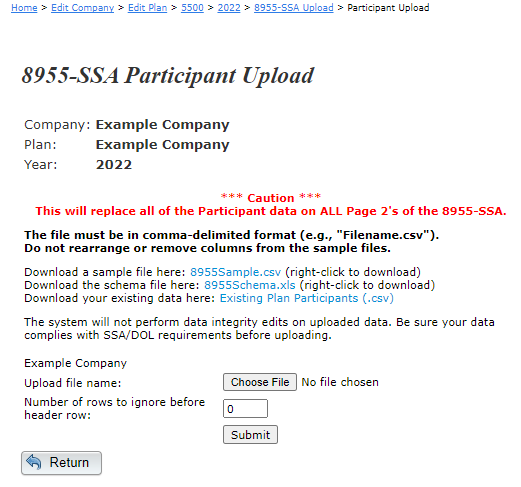
The description of each new page will be "New." You may change the description at the top of the schedule by clicking on the schedule under the "DRAFT - EDIT" heading in the "Form 8955-SSA" box. You will see the text "Enter a 5 character description New" at the top of the schedule/page. Hover your cursor over the word "New" and you will find it is a data entry field that may be modified. You may use any 5 character description to assist you in differentiating the multiple pages of a schedule. You may manually type in the participants on page 2 or you may upload the data by using a .csv file (see 8955- SSA Participant Upload). After you are done completing Page 1 and/or Page 2, click on "Run Edit Checks" on the left-hand side of the screen. Double-click on any field that may highlight in yellow to see the specific edit check. Clicking on the "???" or "Not-OK" status will also run the edit checks for you.
Note: You must pass all edit checks in order to e-file via IRS FIRE and/or ftwilliam.com's fulfillment service.
|
|
|
|
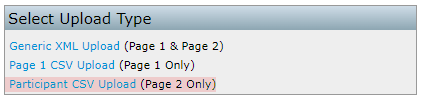
When you are on the "8955 - SSA Participant Upload" screen, save the sample .csv file to your hard drive. Once you have your data entered and saved to the .csv file, browse for the saved file and click "Submit."
|
|
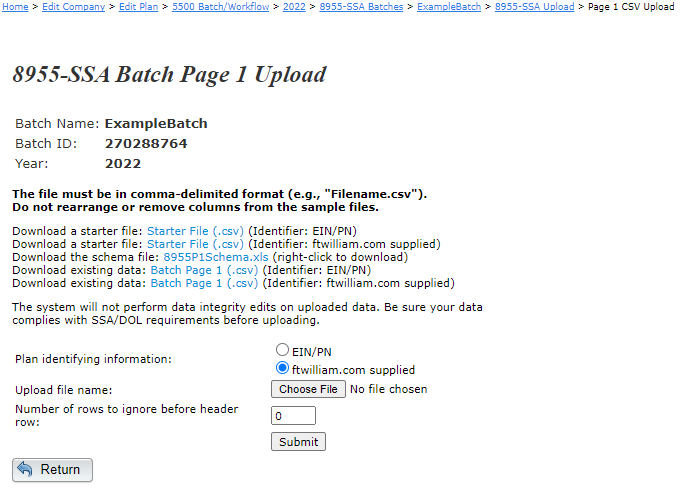
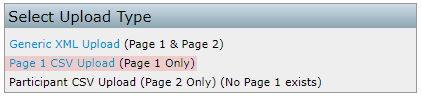
Do not click on "Add Form 8955 - SSA." First, within the "8955 - SSA" box, click on the "Batches/Fulfillment" link. You will be directed to the "8955 - SSA Batches - Year" screen where you would "+ Create New Batch" or click on a batch you have already created. By clicking on "+ Create New Batch", you are directed to the "8955 - SSA New Batch - Year" screen. Enter your batch name and click on "+ Create New Batch". You will now be directed to the "Select 8955 - SSA [Batch Name] Batch Plans - Year" screen, where you should click on "Return" (do not select any plans). Next, you are on the "8955 - SSA [Batch Name] Batch Menu - Year" screen where you would click on "Upload Menu." Click on "Page 1 CSV Upload (Page 1 Data Only)." You will be on the "8955 - SSA Page 1 Upload" screen (shown at right). Save the EIN/PN starter file to your hard drive. On the spreadsheet, enter the EIN and Plan Number of each plan you wish to upload Page 1 data. Once you have your data entered and saved to the .csv file, make sure to select the "Plan identifying information:" as EIN/PN; browse for the saved file; and click "Submit." The plans that you upload page 1 data for will automatically be added to your "Select Plan" list for the particular batch.
From here you are able to batch upload the participants for this particular batch; you can go back to each individual plan to add the p2 to manually add the participants; or you can go back to each individual plan to do the single 8955-SSA Participant Upload.
First, you either have to go to each plan that you would like to batch upload participants for and click on "Add Form 8955-SSA;" follow the steps to 8955-SSA Page 1 Upload for a single plan; or follow the steps to 8955-SSA Page 1 Upload for a batch. Then, you would click on the "Batches/Fulfillment" link within the "Form 8955-SSA" box. From here, you will click on "+ Create New Batch," enter a name for your batch and click "+ Create New Batch."
Now that you have your batch created, you will be brought to the "Select 8955-SSA [Batch Name] Batch Plans - Year" screen where you are able to "Select All," "Unselect All," or check those plans that you wish to add to your batch. You will only view those plans that currently have a Form 8955-SSA started and are not part of another batch - for whichever plan year you are working in.
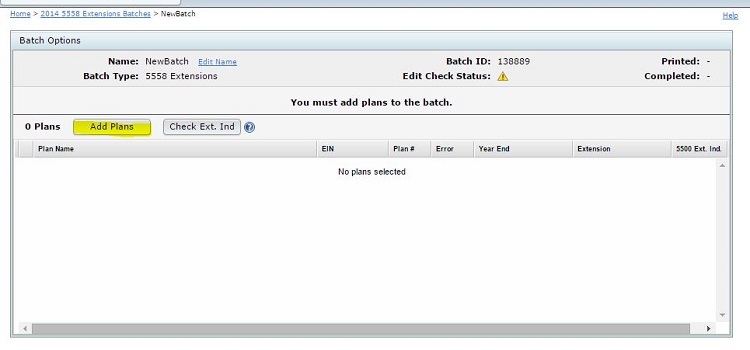
See the section above for information on how to set up a new batch.
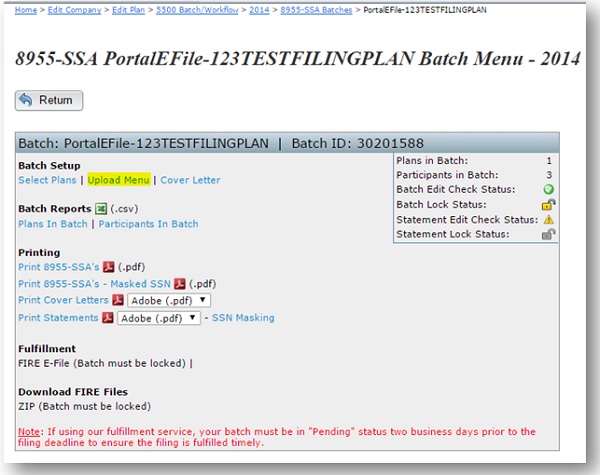
After selecting those plans you want in your batch, click "Update," then "Return" so that you are at the "8955-SSA [Batch Name] Batch Menu - Year" screen. Beneath Batch Setup you will see the "Upload Menu" link. Clicking on the link brings you to the "8955-SSA Upload Menu" screen where you would click on "Participant CSV Upload" to download one of the two "Starter Files (.csv)." The ftwilliam.com identifier file contains plan specific data within the first three columns that may not be altered. The other file contains the plan's EIN and Plan Number, which act as the identifiers. Make sure to select the plan identifying information; browse for the saved file; and click "Submit."
After your edit checks are "OK" for all plans, you will be able to
lock your batch. Click on the lock icon ( /
/ )
to lock/unlock a batch (you may do this from the "8955-SSA [Batch Name] Batch Menu - 20[XX]" screen or the "8955-SSA Batches 20[XX]" shown at
right). You will be able to lock the Form 8955-SSA portion of the batch
without needing to lock the participant statement portion of the batch,
as the statements do not need to be locked in order to submit the batch
to ftwilliam.com for fulfillment or to download your FIRE file. Once
the batch has been locked, you are provided several options, such as
locking the participant statements (if the statements have passed edit
checks), batch printing and/or e-filing, use of the fulfillment service
to mail and print the statements for you (additional fee applies), and downloading reports.
)
to lock/unlock a batch (you may do this from the "8955-SSA [Batch Name] Batch Menu - 20[XX]" screen or the "8955-SSA Batches 20[XX]" shown at
right). You will be able to lock the Form 8955-SSA portion of the batch
without needing to lock the participant statement portion of the batch,
as the statements do not need to be locked in order to submit the batch
to ftwilliam.com for fulfillment or to download your FIRE file. Once
the batch has been locked, you are provided several options, such as
locking the participant statements (if the statements have passed edit
checks), batch printing and/or e-filing, use of the fulfillment service
to mail and print the statements for you (additional fee applies), and downloading reports.
Click on the name of the batch to see more options and to be taken to the "8955-SSA [Batch Name] Batch Menu - 20[XX]" screen shown below at right for a locked batch.
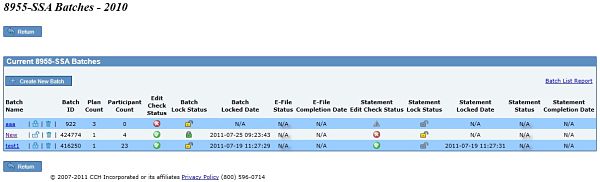
Batch Reports
You will be able to download a .csv file
listing all the plans that are in your batch and/or all the
participants that are in your batch.
Printing
You will be able to print all the Form 8955-SSAs
that are in your batch within a single file. You will also be able to
print the participant statements (.rtf or .pdf format) and a client
letter for each Form 8955-SSA (.rtf or .pdf format) in your batch
within a single file.
Fulfillment
You will be able to click "FIRE E-File" to send your batch to
ftwilliam.com for e-filing fulfillment (additional fee applies). You do not need to obtain a TCC
Code to utilize this feature.
Clicking on "FIRE E-FILE" does not automatically submit your
order.
You must read through the agreement and click "Submit" to proceed. You
will receive a paper invoice from CCH Inc. around the first business
week of the following month after generation. IMPORTANT NOTICE:
Once you submit your returns, they are processed through an automated
system. We cannot make any changes to your forms once they are
submitted.
Here
are
the
basic steps
that are necessary to create a batch to utilize ftwilliam.com's
fulfillment service:
Download FIRE Files
You must obtain a TCC Code specifically for the Form 8955-SSA by completing an online IR Application.
Once you have obtained the code, the Master Admin user for your
ftwilliam.com account may go to the "Admin Menu" and click on "Edit Company Profile." Towards the bottom of this screen, there are fields to enter
the 8955-SSA TCC Code, your company's Contact, EIN and State. Make sure
to click "Update" at the bottom of the screen. After you lock a batch,
you will be able to save the "ZIP" file beneath "Download FIRE Files"
that will contain one file per Form 8955-SSA you have prepared and
placed in your batch. Note: You will have to upload
each file
within the ZIP file separately through the IRS FIRE site; you may not
batch upload like you do for the 1099s.
Here are the basic steps that are necessary to create a batch in order to upload your Form 8955-SSA electronically to the IRS FIRE site:
1. From the "Form 5500 - Year" screen,
click
on
"Batches/Fulfillment" within the "8955 - SSA" box.
2. Once you are on the "8955 - SSA Batches - Year" screen, click on
"Create New Batch."
3. Enter your batch name and click "Create New Batch."
4. You are now on the "Select 8955 - SSA (Batch Name) Batch Plans - Year" screen.
5. Select the plan(s) you wish to include in the batch and click
"Update."
6. Click "Return."
7. You are now on the "8955 - SSA (Batch Name) Batch Menu - Year"
screen.
8.
You are now on the "8955 - SSA Batches - Year" screen, where you will
click on the yellow triangle within the "Edit Check Status" column to
run your edit checks.
9. Once you receive a green check mark for the
"Edit Check Status" column for your batch, you will want to click on
the yellow unlocked "lock" icon within the "Batch Lock Status" column.
10.
After locking your batch, click on your batch name which will take you
to the "8955 - SSA (Batch Name) Batch Menu - Year" screen.
11. From
the "8955 - SSA (Batch Name) Batch Menu - Year" screen, you will click
on "ZIP" below "Download FIRE Files" to download and save the file you
will upload to the IRS FIRE site. The Zip file contains individual .txt
files for your plans; you will upload the individual .txt files to the
FIRE site.
Printing top
If you chose to print and mail the Form 8955-SSA plan by plan and later discover an error, then you would go back to the draft Form 8955-SSA, check the box for Part I, Item B. Make any updates necessary and file with the IRS. Or, if you wish to use the fulfillment service for the newly amended plan, then go to 'Batches/Fulfillment' to create a new batch, making sure to check the box "Amended batch?*". When you are brought to the select plan screen, you will see a listing of all plans that have the amended box checked on the 8955-SSA and that are not a part of another batch.
Fulfillment top
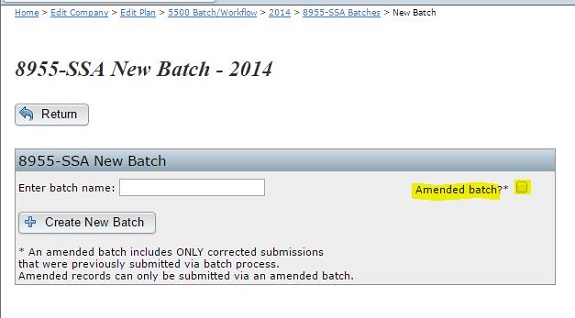
If you chose to use our fulfillment service and later discover an error, then you will have to create a new batch. While creating the new batch, make sure to check the box "Amended batch?*". When you are brought to the select plan screen, you will see a listing of all plans that have been fulfilled. Once you have selected the plan(s) you are amending, you will be able to go to the specific plan to make changes on the draft Form 8955-SSA. Part I, Item B will automatically be checked for you.
Portal
E-File top
If you chose to have a portal user E-File via the portal and later discover an error, then you will have to go back to the plan to click on the draft Form 8955-SSA to click on "Amend 8955". By clicking on the button, the form will become editable, and the Amend box will be auto-checked. When the Form 8955-SSA has an OK status, the plan can be E-Filed again via the portal.
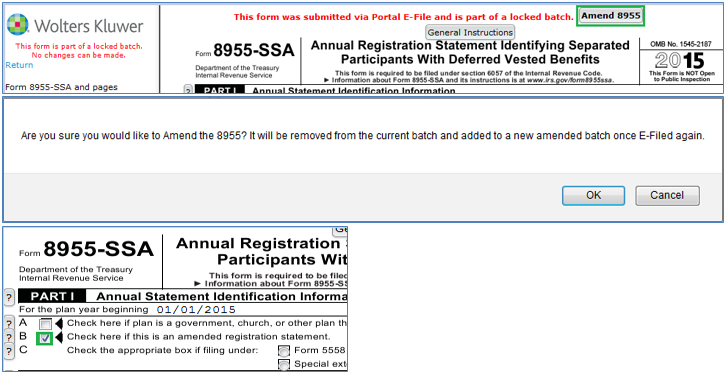
Download FIRE files top
If you chose to download the ZIP file and later discover an error, then
you will have to unlock your batch and remove the specific plan you
need to amend. Then, go to the plan and check the box for Part I, Item
B. Make any updates necessary and go back to the 'Batches/Fulfillment'
to create a new
batch, making sure to check the box "Amended batch?*". When you are
brought to the select plan screen, you will see a listing of all plans
that have the amended box checked on the 8955-SSA and that are not a
part of another batch. Once the plans have been selected, lock your
batch and download the ZIP file.
Each plan will have a default letter set
up
that was
drafted by
ftwilliam.com, which is located in the "Admin Menu" by clicking on
"SAR/AFN/8955 - SSA Defaults." To modify the client letter, you have
two
options:
Single Plan:
For a single plan, you would go the "Form 5500 - Plan Year" screen and
access the "Client Letter" in the "Form 8955 - SSA" box. It is located
below the draft Form 8955 - SSA. The system will automatically save any
changes you make.
Global:
To set up a global default of your own, you would go to the "Admin
Menu"
and click on "SAR/AFN/8955 - SSA Defaults." Make any changes necessary
within the "8955 - SSA Defaults" box. The system will automatically
save
any changes you make. This will be the default client letter for batch
printing. If you have already generated the Client Letter within a
company/plan, then make changes to the "SAR/AFN/8955 - SSA Defaults"
screen, the changes will not update the already-generated Client
Letter.
Batch:
To set up a batch default of your own, you would go the "Form 5500 - Plan Year" screen and click on "Batches/Fulfillment" within the "Form 8955-SSA" box (or select "5500" from the "Batches" drop-down list on
the "Select Company" screen). Next, click on your batch name and select
"Cover Letter." From here you can choose to have "None," "Company Default," "Plan Specific" or "Batch Specific." If you choose the "Batch Specific" option, you are able to make any changes necessary on the
same screen. Be sure to click "Update." This will be the default client
letter for batch printing.
If you find that you need to prepare a prior year SSA, whether as an original or to amend, you will notice that the process is similar to the prior year 5500 filings.
You will be able to prepare a batch and submit for fulfillment, or you can download the .txt file if you plan to e-file on your own 8955-SSAs. (TCC Code required).
Note. SSN Masking is a Global feature that only Master and/or Designated Admin users will be able to access.
Users may print a copy of the client letter with the Form 8955-SSA with the SSNs masked by default by clicking on 'Print Client 8955-SSA - Masked SSN'. This copy will contain a watermark at the top of all pages stating, "Client copy: do not file with IRS". Otherwise, users may continue to print the client letter with the Form 8955-SSA without masking the SSNs by clicking on 'Print Client Letter w/8955-SSA's'.
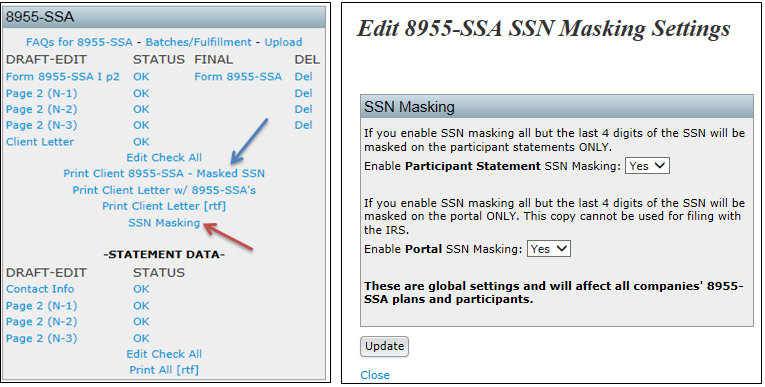
Users that wish to mask the SSNs from the copy that is published to the portal, or to mask the SSNs on the participant statements should click on 'SSN Masking' (see image above). To mask the SSNs in the portal, update 'Enable Participant Statement SSN Masking:' to Yes and be sure to click 'Update'. To mask the SSNs on the participant statements, update 'Enable Portal SSN Masking:' to Yes and be sure to click 'Update'. Portal Users that have View/Print and/or E-File 8955-SSA permissions with the Masked SSNs enabled for the Form 8955-SSA will receive a copy that resembles the Form 8955-SSA that the user generates by clicking on 'Print Client 8955-SSA - Masked SSN'. Note. SSN Masking is a Global feature that only Master and/or Designated Admin users will be able to access.
Single Plan:
Once you have the Form 8955-SSA completed, specifically page 2s, then you will be able to update participant addresses below the "Statement Data" portion of the "Form 8955-SSA" box. You will want to click on "Edit Check All" to run the edit checks for the statements. The "SSN Masking" option is only available to master/designated admins and is a global feature. By clicking on "Print All," you will generate a copy of the statements in a .pdf format. By clicking on "[rtf]," you will generate a copy of the statements in Word.
Batch Upload:
First, you would have page one of the Form 8955-SSA added, whether it was added manually; single plan upload; or via batch upload.
Next, you would create a batch and place those plans you wish to batch upload into that batch. Click on "Upload Participants" so that you may download the "Starter File (.csv)" file. You may not use the "8955Sample.csv" file that you used for each individual plan; the "Starter File (.csv)" contains plan specific data to help determine which participants belong to which plan. Once you have the starter .csv file updated, you are then able to do your batch import.
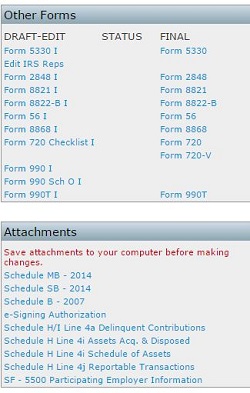 |
The Form 5330, 2848, 8821, 8822-B, 56, 8868 and 720 can be completed by clicking on the link that corresponds to the form under the "DRAFT-EDIT" column in the "Other Forms" box. The forms are completed just like any other 5500 form. Data is saved immediately after entering the data (no update buttons) and edit checks work similarly as well.
Once you are finished, click on the form link under the "FINAL" column in the "Other Forms" box. This will open a PDF file you may save to your computer and print.
The ftwilliam.com software will allow you to set up default Paid Preparers to select for use on the Forms 5330 and 720. To add default reps, click on 'Edit IRS Reps' under the 'DRAFT-EDIT' column within the "Other Forms" box. Next, click on "Add Rep" where you will enter the Rep's First and Last Name. Then, select the new rep from the list and click on "Select Rep". Those Reps who have a PTIN listed will display in the Paid Preparer's drop-down list. You may also enter the Paid Preparer manually if you do not wish to create defaults.
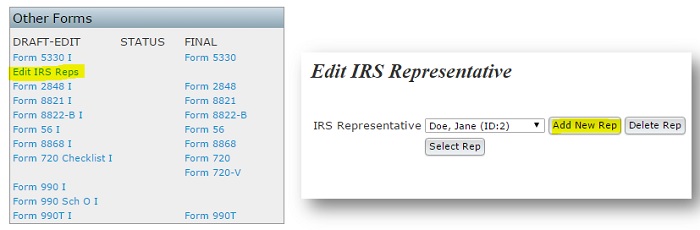
These are simply blank Schedule MB/SB forms.
A sample e-Signing Authorization you can use to electronically sign on behalf of your client is provided. The client must still sign the 5500 on paper and an image of that signature must be attached to the electronic filing as a PDF. The authorization need not be attached to the electronic filing sent to the DOL, but rather kept for your records. DOL has indicated it wants a new authorization for each filing year.
These links will open .xls files (Excel) that can be filled in, saved to your hard drive and printed to PDF to then be added as attachments to your filing.
Editing the Forms (PBGC Forms) Top
You must first choose the Form or Schedule you wish to edit under the "DRAFT/EDIT" column in the "PBGC - Year" Forms box located on the "Form 5500 - Year" page.
In the data entry screen, simply click on the line where you would like to enter data and begin typing. The forms are completed just like any other 5500 form. Data is saved immediately after entering the data (no update buttons) and edit checks work similarly as well.
Uploading/Downloading PBGC Comprehensive Data (.csv format) Top
You can easily upload your data into the 2009-present Comprehensive PBGC Forms, instead of manually typing in your data one plan at a time. The upload feature will allow you to upload data one plan at a time (see Single Plan Upload below), or if you have multiple plans, you can upload data for multiple plans (see Multiple Plan Upload below). We strongly recommend that after you upload your data, that you go to the draft form to verify the data and run edit checks.
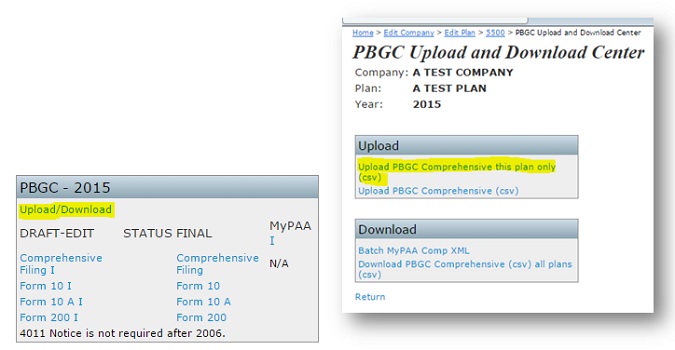
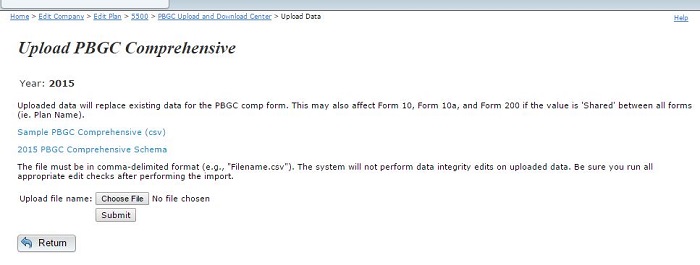
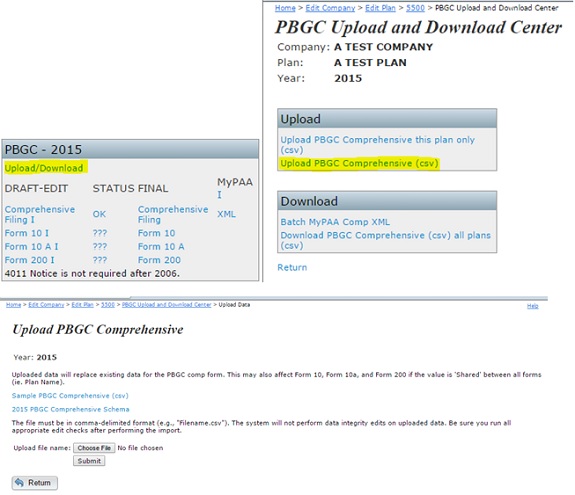
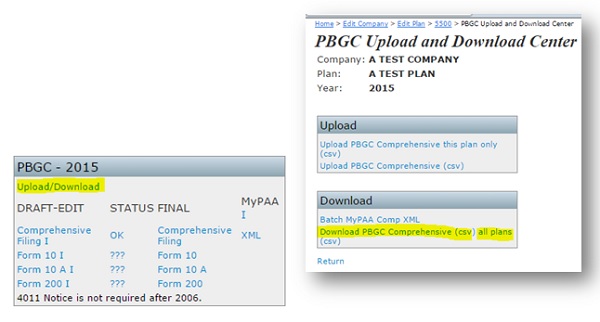
Export Batch XML Files for MyPAA Top
You can easily export your data in .xml format for the Comprehensive PBGC Forms for easier upload into MyPAA. The export feature will allow you to select multiple plans at a time to export and to refresh edit check status for multiple plans at one time.
To access this feature, click on the 'Upload/Download' link within the "PBGC - 20XX" box, then click on the 'Batch MyPAA Comp XML' link. A pop-up screen will display with a list of plans that all have an active Comprehensive Form. The edit check status, as well as the Plan Year End date will also display. You are able to select all the plans that appear, or you can check them off one at a time. Then, click on the "Do With Selected" drop-down, on the lower left-hand side of the screen, and select 'Download XML' to receive one .xml file with all of your data for those plans selected. Or, you can select 'EditChecks' to re-run/refresh the edit checks for those plans you've selected. Note. For those plans that have a '???' or 'Not-OK' status, blank .xml will download. You will need to have an 'OK' status for all plans you check off to download the .xml.
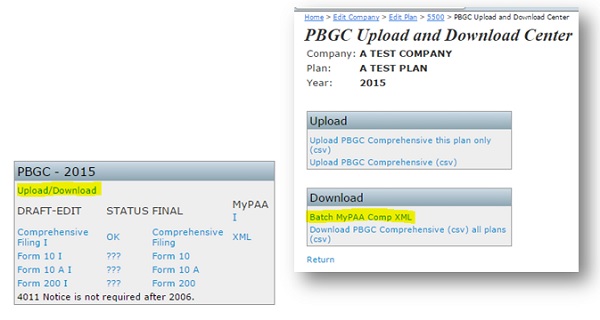
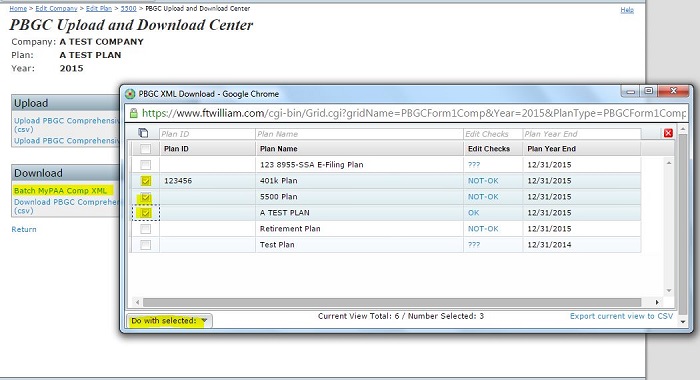
Help (PBGC Forms) Top
While preparing your forms, there are context-sensitive help buttons located next to each Form in the form of an "I" as well as next to each line item in the form of a blue box with a question mark inside. If you still cannot figure out the answer, click on the "support" link at the top of the page to send us an email or call us at 800.596.0714.
Error Checking (PBGC Forms) Top
In order to perform error checking on your forms, you must click on the "???" underneath the "STATUS" column in the "PBGC - Year" box.
Once you have clicked on "???" you will be directed to a new window displaying the edit checks that your form did not pass.
You will now notice that you no longer have "???" under the status column, but instead a "NOT-OK" status indicating that you have some errors in your form.
In order to get an "OK" status, you must correct all of the errors in your form and repeat the edit checking process. Eventually you will have an "OK" status for all of your forms. It is important to make sure that you pass the editing checking because you will not get the XML file you need for the "My PAA" section of the instructions.
Printing (PBGC Forms) Top
Once your forms have been prepared and you see an "OK" status in the "STATUS" column, it is now suitable to being printing and saving your forms. In order to generate a PDF of your forms, you must click on the form name in the "FINAL" column of the "PBGC - Year" box.
When you click the form name under the "FINAL" column, a PDF version of your form will generate on the page.
Now that you have generated your PDF, you may save a copy to your computer and/or print it for signature.
My PAA (PBGC Forms) Top
Now that you have completed the preparation of your forms, you may electronically file them using the MyPAA. In order to electronically file, you must download the XML file that is generated on the ftwilliam.com website. You will NOT see an option to download the XML file if you do not pass the edit checking. This prevents any errors being filed with PBGC.
In the "MyPAA" column of the "PBGC - Year" box, you will find that there is a link provided called XML. You must click on this link and SAVE the file to your computer.
Click the "Save" button and save the XML to your computer.
If you need assistance with the MyPAA Website, click the "I" underneath the "MYPAA" heading in the "PBGC - Year" box. By clicking this link, you will open a new window displaying the My PAA User Manual.
What is 55Autofill*?
55Autofill* allows you to download all of the prior year's Form 5500 data from the DOL database into the current year's 5500 forms by entering the plan sponsor's EIN number.
Where does the information come from that is used for 55Autofill*?
The information that appears in your forms and schedules after adding a company and plan is retrieved from the DOL database of Form 5500 filings.
Does 55Autofill* only work if we were a customer in the previous year?
It does not matter if you used our software in a previous year. As long as you filed a return in a previous year, you should be able to retrieve the information.
I know we filed a return last year, why isn't my information showing up when I use 55Autofill*?
If you filed a 5500EZ last year, the information will not appear when using 55Autofill*. The DOL does not release that information to the public. If you did not file an EZ and your information still does not appear, it could be that we have not received your information from the DOL yet. We receive quarterly updates, but we always provide three years' worth of 5500 data in case your most recent filing does not appear.
What is the EIN look-up?
The EIN look up is a convenient tool used to search for an EIN number using the company name and the state.
If I used ftwilliam.com last year will my data automatically carry forward to the new year or do I have to use 55Autofill* again?
If you used our software last year, that information will automatically transfer into the new forms and schedules for you by clicking on "Bring forward 20XX to 20XX for this plan only." Please see Add Forms and Schedules above, for further information. You do not have to use 55Autofill* again.
How do I use the upload features (Form 8955 - SSA, A, B etc.)?
If you would like to use one of our upload features located on the Form 5500 generation page, you must first click on the "Upload and Download Center" link provided underneath the "5500 - Year" box and download the sample spreadsheets we have supplied you (the sample spreadsheets for the Form 8955 - SSA uploads are found within the "8955 - SSA" box by clicking on "Upload"). Once you have made sure that your data is set up the same way as our sample and you have saved the file in .csv or .XML format, you then may begin uploading your data. To upload the file, click on "browse" and search for your saved file. Once selected, you may then click on "Submit" and all of your data will be uploaded into your forms/schedules. Please see Upload and Download Center above, for more information or call 800.596.0714 for further assistance.
I uploaded information into my schedules, but there were mistakes, how do I clear out the schedules without having to do them one by one?
First you must make any corrections to the spreadsheet and then save your changes. By uploading the corrected spreadsheet, it will replace all of the existing data so that you do not have to delete each schedule at a time.
How do I edit check my 5500 forms and schedules?
In the "5500 - Year" box there are three columns: "Draft/Edit," "Status" and "Final." The middle column called "Status" is where you do your edit checking. Each time you update your form, three question marks will appear next to the form in the "Status" column. If you click on the question marks, the system will tell you of any errors on the forms and will display an "OK" or "NOT-OK" next to the corresponding form or schedule. Once you have made corrections in the "Draft/Edit" version of the form, you will want to redo the edit checks by clicking on the three question marks, or run all edit checks by clicking on "Edit Check All 5500 Schedules" found on the "Form 5500 - Year" screen below the "5500 - Year" box.
How do I complete a Final or Short Year filing when the form has not yet been made available?
If you are completing a filing for a plan that has terminated in 2022, for example, and need to use a 2022 Form 5500, you will need to use the 2021 Form 5500 to complete the filing prior to December 31, 2022, as the DOL does not allow a 2022 Form 5500 to be filed prior to January 1, 2023. Once you have used the current year's Form 5500 for one plan, click on the "Clone 2020 Return/Report within 2021 for this plan only" link under the "5500 Menu". The Clone Return/Report feature is a quick way for users to clone a plan, including a clone of the Return/Report, to create Finals or Short Plan Year filings within the same plan year, in addition to adding the Portal User on file for the original Return/Report. Using the feature will add 'Final [timestamp]' at the end of the Plan Name to distinguish which plan is which. Note: The 'Final [timestamp]' will not be added to the Plan Name on the Return/Report.
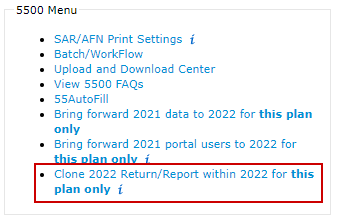
How do I save my forms and schedules on my computer?
If you would like to store a copy of your forms and schedules on your hard drive, you will want to choose the "Final" version of the form in the "5500 - Year" box. Once you have opened the "Final" version, simply click on "File" and select "Save As" and you will be able to choose where you want to save your forms and schedules. Because the final version of your form is a PDF file, you may email your forms and schedules to your clients. If you choose to do this, you must first save the file to your computer and then attach it to an email. Do not use the email icon in Adobe.
How long will my filings be stored on the ftwilliam.com website?
We anticipate that we will retain at least six years of data from the date the filing was e-filed. For example, if you prepare a DFVC filing for 1999 in 2013, we will keep the data on the site until 2019.
How do I file a late return?
When you sign up with us, you will have access to complete filings back to 1988. If you are filing a return that goes back further than that, simply use the most recent Form 5500 and change the plan year beginning and ending dates to reflect the dates of the filing.
What are the blue boxes with question marks that appear on my forms and why is there an "I" next to all of my forms and schedules?
For your convenience, we provide you with help buttons on all of your forms and schedules. They appear as a blue box with a question mark inside them. When you click on a blue box, instructions for that particular section or question on the form will appear in a text box on the page. The "I" that you see next to your forms and schedules are links to the DOL instructions. Simply click on the "I" and you may reference the instructions if you have questions.
What is the due date of the Form 8955-SSA?
The Form 8955-SSA is due the last day of the seventh month following the last day of that plan year. If the filing due date falls on a Saturday, Sunday, or legal holiday, the annual registration statement may be filed on the next business day.
If you complete a Form 5558 (extension) by the due date of the filing, you would be able to extend the due date an additional 2 1/2 months after the normal due date. For example, a calendar year plan would normally be due July 31st, but if on extension, the due date would be extended to October 15th.
Note: Signatures are not required when completing the Form 5558 for the Form 8955-SSA but they are required when completing Form 5330.
How do we e-file the Form 8955-SSA if we obtain our own TCC Code?
Once you have obtained the code, the Master Admin user for your ftwilliam.com account may go to "Admin Menu" and click on "Edit Company Profile." Towards the bottom of this screen, there are fields to enter the 8955-SSA TCC Code, your company's Contact, EIN and State. Make sure to click "Update" at the bottom of the screen. Once you create a batch file, click on "Batches/Fulfillment" and lock that batch. You will then be able to obtain the "ZIP" file that will contain one file per Form 8955-SSA you have prepared and placed in your batch. Note: You will have to upload each file within the ZIP file separately through the IRS FIRE site; you may not batch upload like you do for the 1099s.
How will ftwilliam.com e-file the Form 8955-SSA for us?
To take advantage of the fulfillment service, you would complete your Form 8955-SSAs, then "Create New Batch," by clicking on "Batches/Fulfillment," and mark those plans you want e-filed and click "Update." Once your batch is completed and you have passed all of the edits checks, you will be able to lock the batch and click on "FIRE E-File" below the "Fulfillment" header. You will then be brought to another screen where you confirm the fulfillment.
What is the cost to have ftwilliam.com e-file the Form 8955-SSA for us?
The cost is $17.15/batch, plus $1.80/plan within the batch. If you have 200 Form 8955-SSAs in one batch, the cost would be $377.15. Note: The batch/plan fee increased on 10/1/2025.
Is the participant statement required?
The IRS has published more guidance on this question, which can be found at on the IRS website for the 8955-SSA FAQs site.
How does the website provide security?
ftwilliam.com utilizes SSL technology in order to protect all data while it is in transit from your web browser to the ftwilliam.com servers. SSL technology is the same technology and method of encryption that banks and other online merchants use to secure their transactions.
The data stored on the ftwilliam.com servers can only be accessed by those at your company who have a username and password for the ftwilliam.com system.
Are we able to bring forward participant data from prior years?
We do not bring forward prior year participant information because this changes from year to year. You can always download your participant information and re-upload it using the "Upload" link found within the "8955 - SSA" box. Basic plan information will populate the Form 8955-SSA.
Are there signature requirements when e-filing?
There are no signatures requirements when e-filing. However, it is always best practice to send the Form 8955-SSA to the plan administrator and sponsor for manual signature to keep on file for their records. Please see the below information from the IRS' 8955-SSA FAQs:
Q14. If the plan administrator and plan sponsor are the same person, in which capacity should that person sign the Form 8955-SSA?
If the plan administrator and the plan sponsor are the same person, that person should sign as plan administrator.Electronic signatures are not required for electronically filed Forms 8955-SSA. The name of the administrator or sponsor should be typed into the signature line. Administrators and sponsors are not required to have their own FIRE Transmitter Control Code, User ID or PIN.
Q15. Will the IRS accept scanned, faxed or copied signatures on Form 8955-SSA?
Yes. Although we prefer original signatures in ink, we will also accept scanned, copied and faxed signatures as well as original signatures in pencil.
How do I complete Line 6a and/or Line 6b on page 1 of the Form 8955-SSA?
The instructions for the Form 8955-SSA are a little more clear on whom to report on Line 6a and Line 6b. You could interpret the instructions to only report participants with Code As on Line 6a/6b and to report everyone (Code A, B, C and D) at Line 9.
If you still have questions after reading our FAQs, please feel free to contact us via email at support@ftwilliam.com or call us at 800.596.0714.
* Patent Pending